› RC BOATING › YACHTING › Builds › Predators Mount Gay 30 rebuild
Tagged: 3D printing, Mount Gay 30, plank stripper, RC Yacht, refurbishment
- This topic has 72 replies, 4 voices, and was last updated August 2, 2021 at 6:44 pm by
 Admin.
-
AuthorPosts
-
-
27 April 2019 at 16:53 #2861
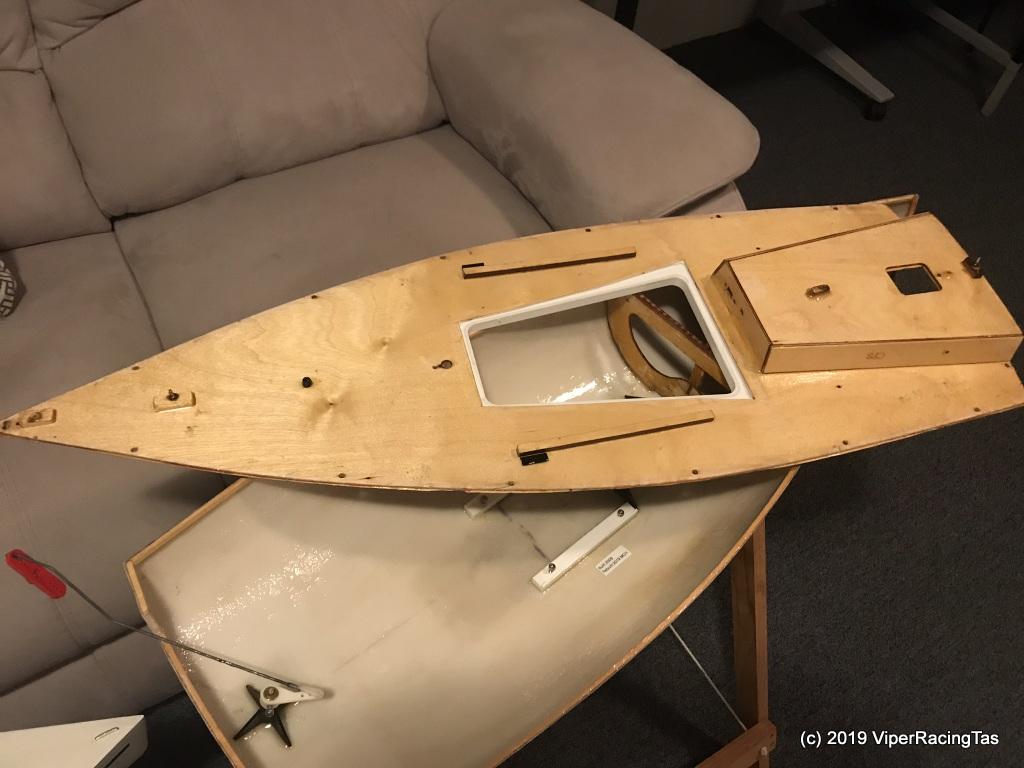
Just happened to be in the right place at the right time today to procure a Mount Gay 30 RC yacht. I had offered to buy the very same yacht many months ago but my offer at the time was significantly less than the asking price and not acceptable.
Today it just had to go.
According to Uncle G there were approx 30 Mt Gay 30’s imported into Tas in the 80’s and those that have been viewing our Youtube videos from the early days of our sailing at the Canal will no doubt remember the red & white “Little Honda” Mt Gay 30 that was regularly sailed by our dearly departed sailing buddy Alan Furmage.
I have not seen this particular one sail but it appears as if it’s not going to take too much work to get it back on the water.
The rudder needs some repairs & re-centering, the rigging needs a bit of work to straighten the mast & get the sails setting correctly and the sailwinch arm will need altering as currently when the main is full 90 deg the jib is out almost 180 deg.
Other than that she all looks pretty shipshape, even the 9X8C V2 receiver installed in the boat was a direct match for my Turnigy ER9X radio that I generally use for yachts. She could be back on the water as early as next weekend.
A couple of pics
-
27 April 2019 at 21:35 #2863
That is going to be one hellva beautiful boat under sail…….. cant wait to see her purring along
-
31 May 2019 at 16:16 #2941
Thanks Kermit, yes she looks good on the water.
-
-
31 May 2019 at 16:13 #2940
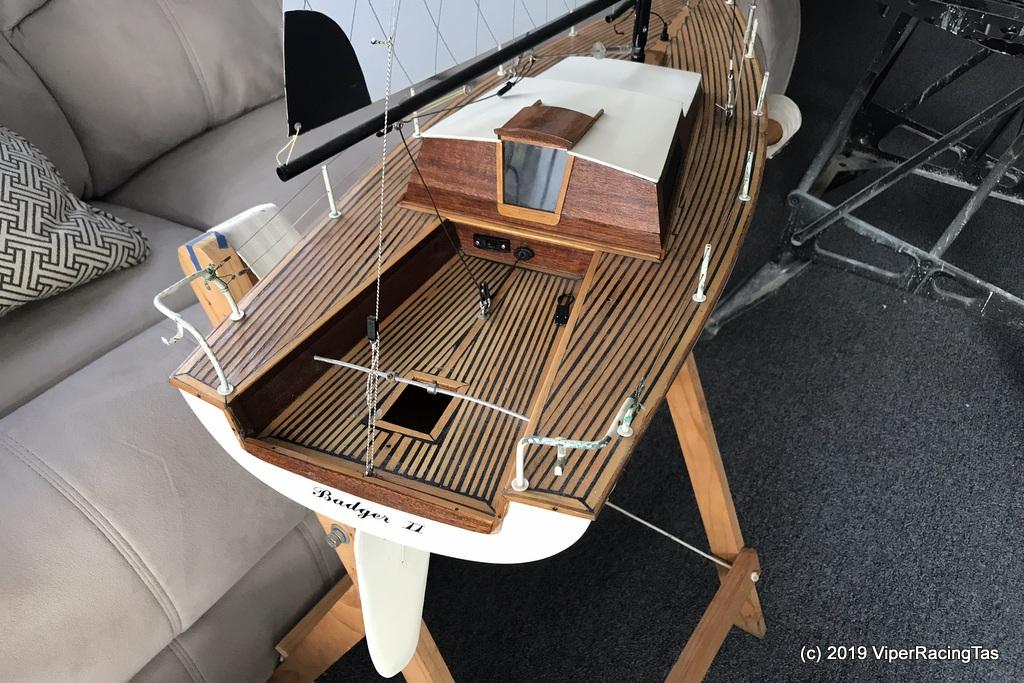
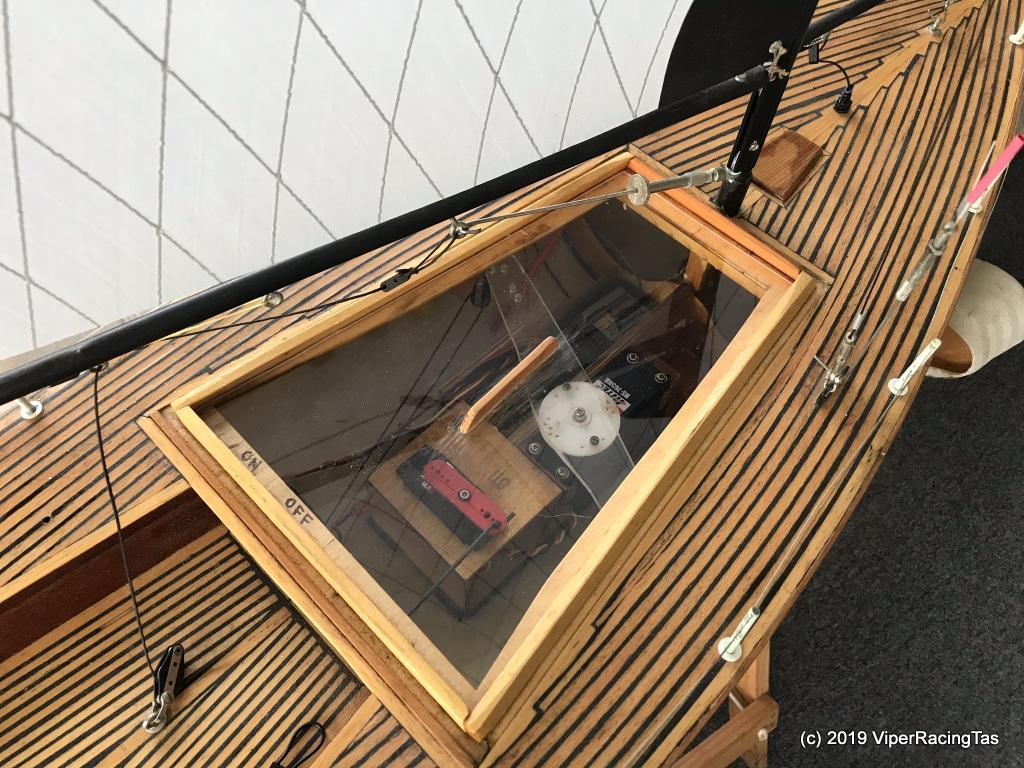
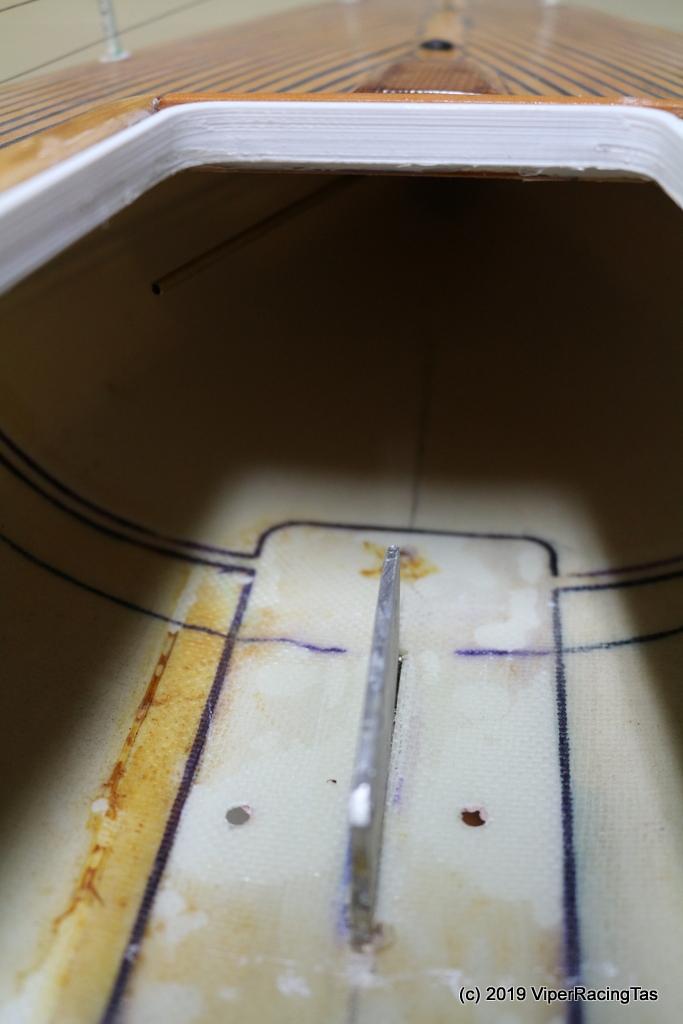
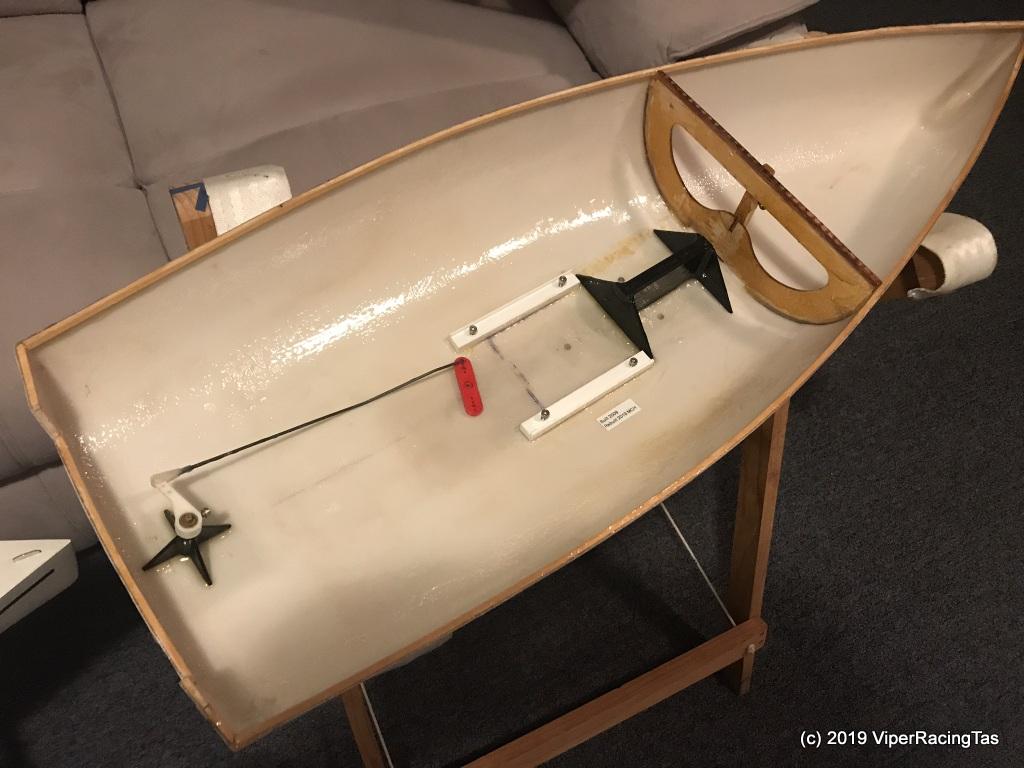
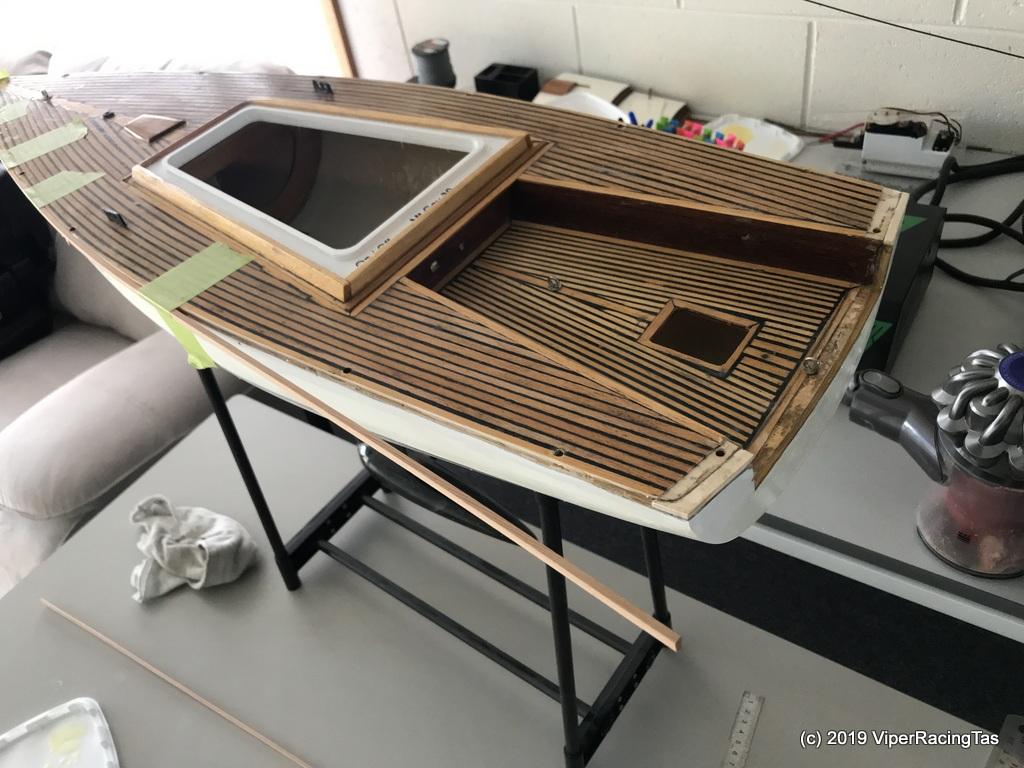
After a lot of head scratching & a couple of false starts I finally came up with a simple way to waterproof the open hatchway of the Mt Gay 30.
I decided something was needed after getting water inside the hull on her first Puddleduck sailing & after reviewing the onboard video footage it was fairly obvious where it got in.

As can be seen in the previous post the hatch cover was simply a piece of Perspex sitting on a timber lip.
I have now 3D printed a solid surround that has been silicone sealed into the deck
This has a raised internal lip (similar to a “Tupperware” seal) to which is fitted a 3D printed cover seal.
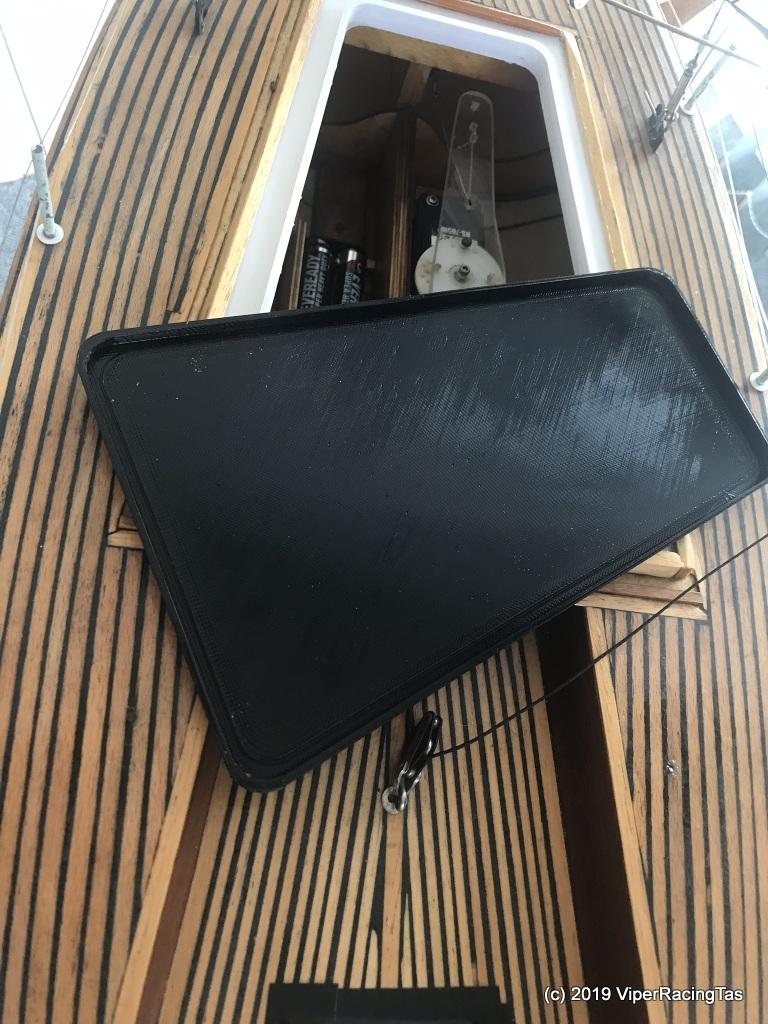
The frame is printed in PLA+ and the lid in PLA Flex to allow it to stretch & seal.
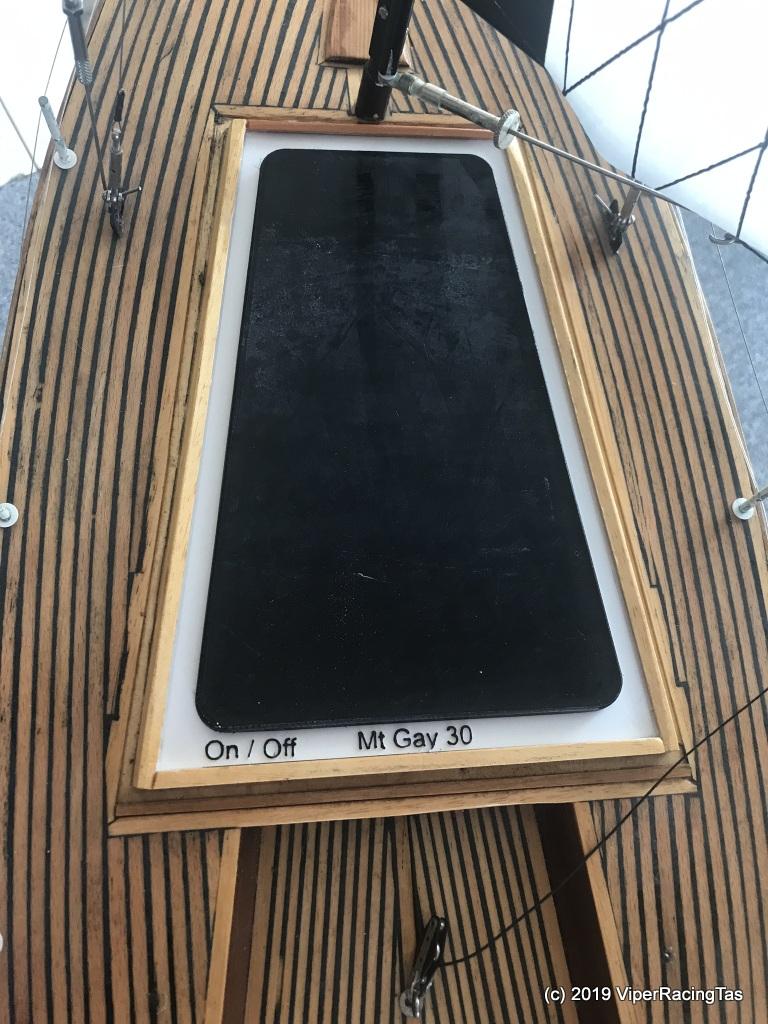
The new frame & cover do not interfere with fitting of the cabin top
Next job will be tidying up the paintwork on the cabin top and hand rails etc then onto the sails & rigging.
-
12 July 2019 at 10:23 #3092
After a recent sailing @ Puddleduck chasing another Mt Gay & a few DF65’s the poor old Badger II was found to be carrying a significant amount of water ballast. With so much water inside her it was easy to spot the leak.
It turned out that virtually the whole hull to deck join was badly leaking so all the previous work waterproofing the hatches was having little or no effect.
At first it was thought that some self levelling epoxy poured into the inverted hull may have been enough to fix the problem but on closer camera inspection of the joint from inside the hull it was decided to remove the entire deck and start again.
The timber Servo/radio/battery/keel mountings had already been removed as they were showing signs of water-logging over a long time & their removal allowed for easier internal access to the hull.
Control Gear Timberwork & bulkhead removed
Inverted deck (after removal)
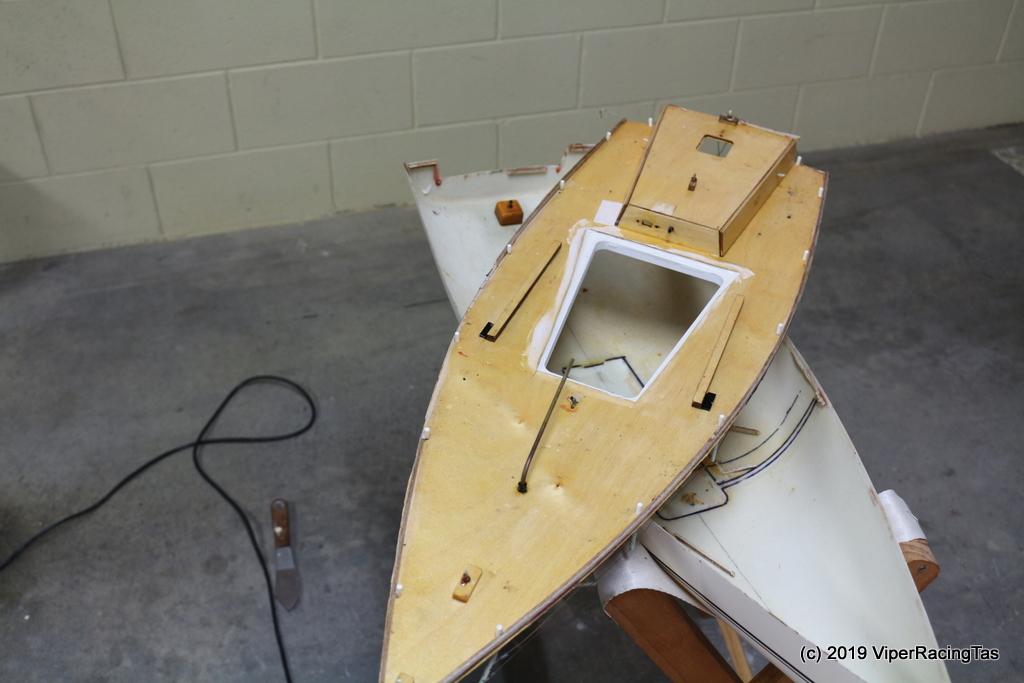
The hull (with deck removed)
I guess glues weren’t as good 20 years ago or else “Badger II” was built more as a display model but whichever the reason there was very little persuasion required to get everything unstuck with the only damage being the rubbing board around the deck which came off in quite a few pieces.
First order of the day will be fibreglass the alloy keel into the hull then 3D print & install mounting braces for the keel & rudder post. Once that is done then a new timber deck mounting rail will be installed & sealed followed by refitting the deck after a bit of a clean up.
Not sure yet but I may just fit a new deck entirely as it may be easier.
To Be Continued…
-
12 July 2019 at 13:02 #3093
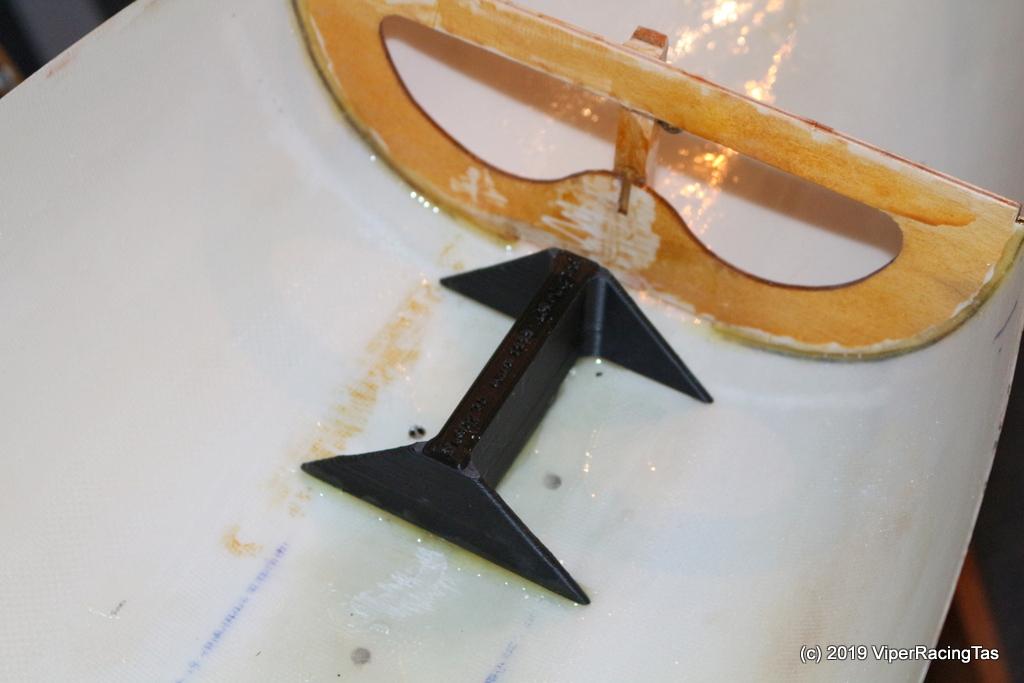
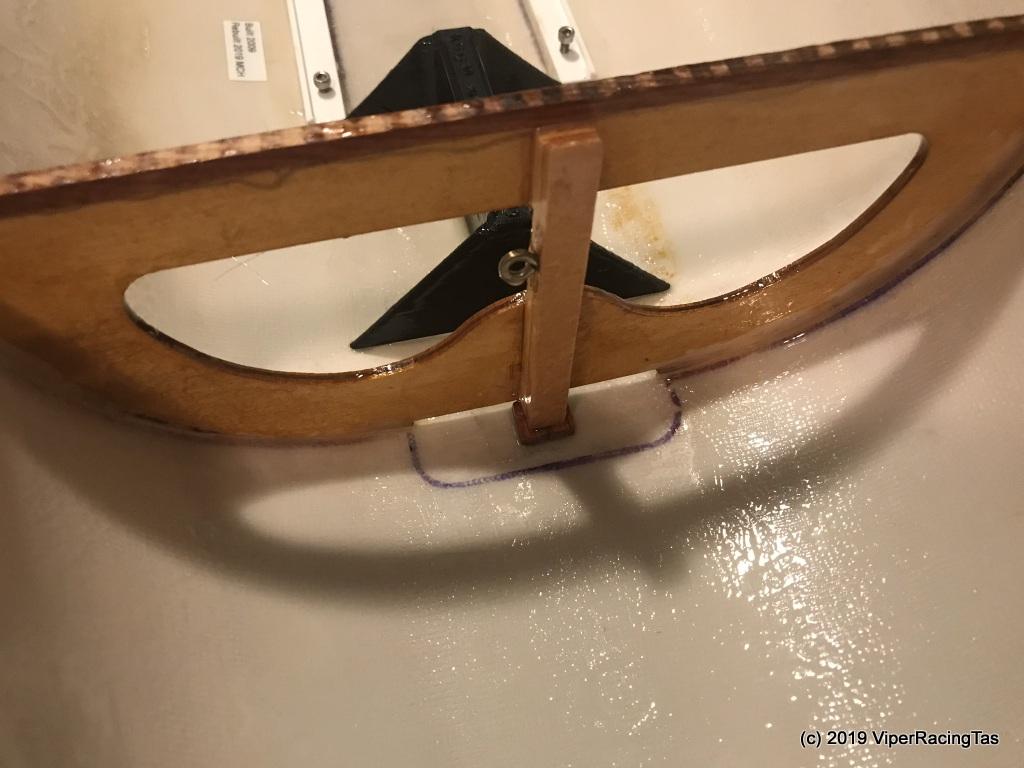
Seeing as I’m stuck inside on this cold, wet & windy day its a good time to get things done so moving right along with the repairs the new rudder support post has been designed, printed & fitted to the Badger II.
The 3D design ready for printing
 New Rudder Support Post- Printed & epoxied into place
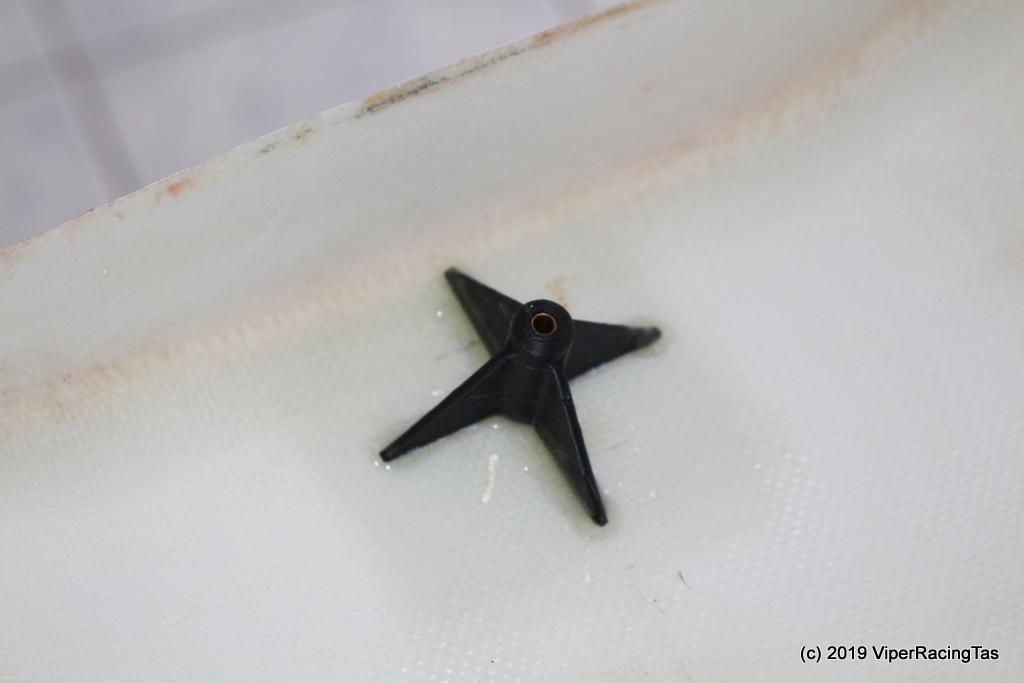
The original Rudder mounting block that had come unstuck from the hull

-
12 July 2019 at 15:07 #3094
she will be a force to be reckoned with when shes up running again I bet that printer is worth its weight in gold by now ay
-
12 July 2019 at 15:20 #3095
Yes Kermit, the 3D printer certainly makes modelling a whole lot easier & quicker.
-
-
13 July 2019 at 16:57 #3098
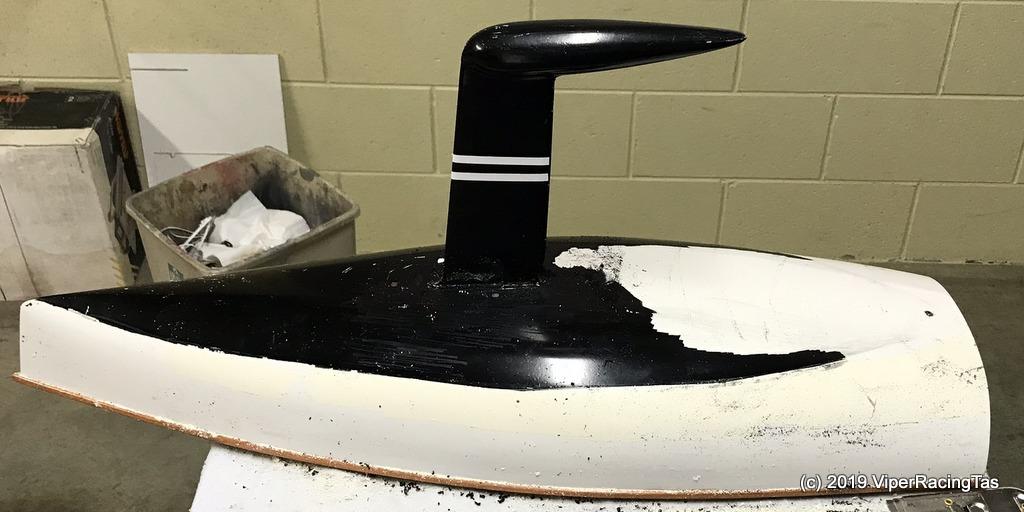
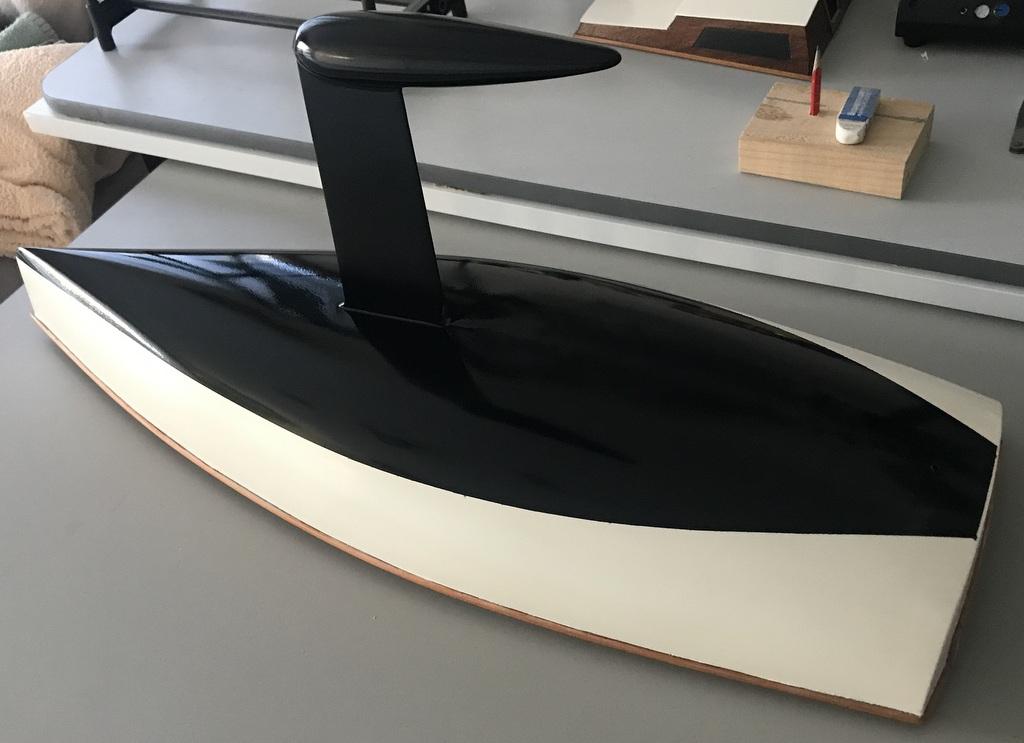
The keel fin has now been fibre-glassed into the hull & reinforced with woven glass mat and the forward bulkhead (in fact the ONLY bulkhead) that sits under the mast has been reinstalled & epoxied into place.
Keel fin & forward bulkhead
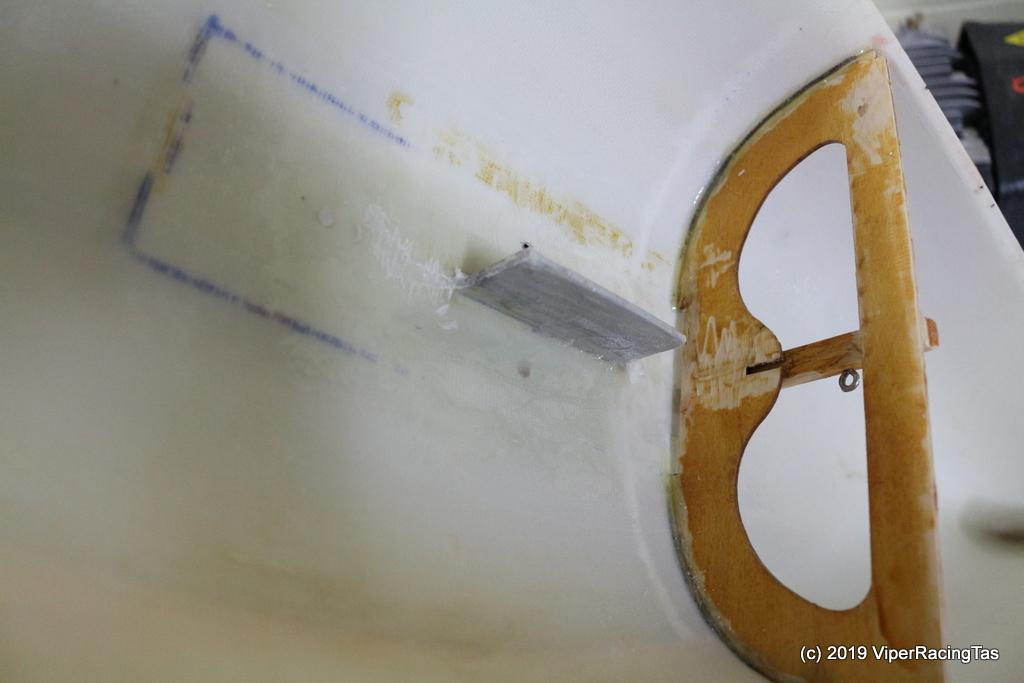
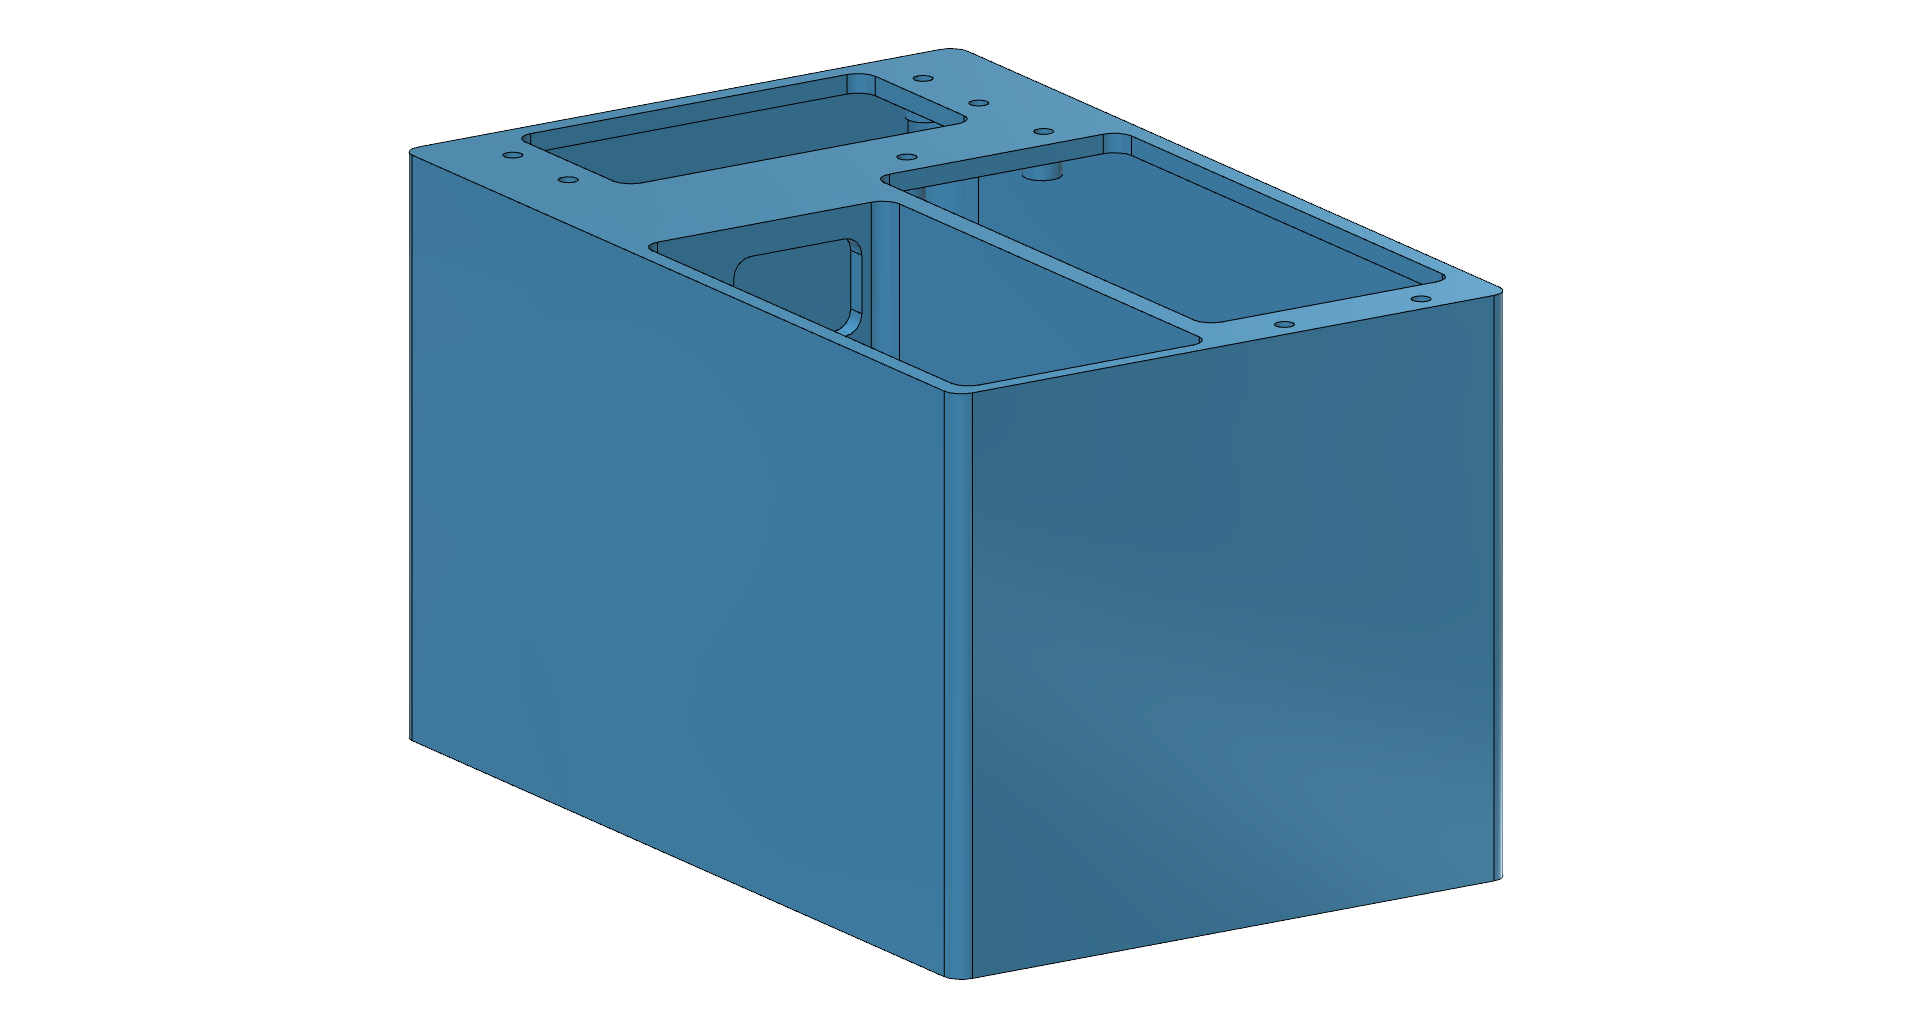
Next job is to finish off the design of the new 3D printed Servo Tray and get that fitted so I can see where the keel fin bracing needs to be installed.
-
14 July 2019 at 13:37 #3100
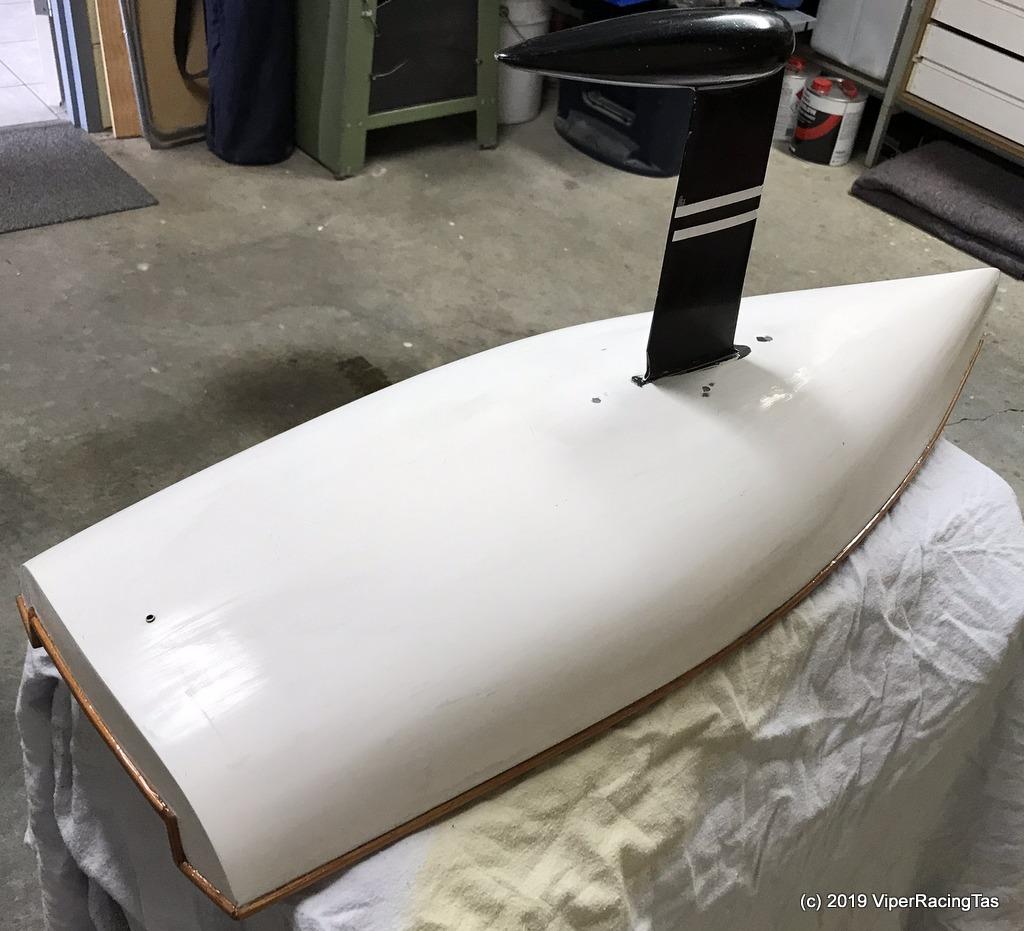
Keelbox & support bracing is next on the list for 3D printing.
Design is complete & printing now underway.
Keelbox & bracing to go over & secure the alloy keel fin to the hull
Once this is epoxied in place the Servo tray can be completed & installed then I can think about refitting the deck and making sure it is sealed this time, which is where the job started
Update:
Keel box now installed.
-
16 July 2019 at 12:36 #3102
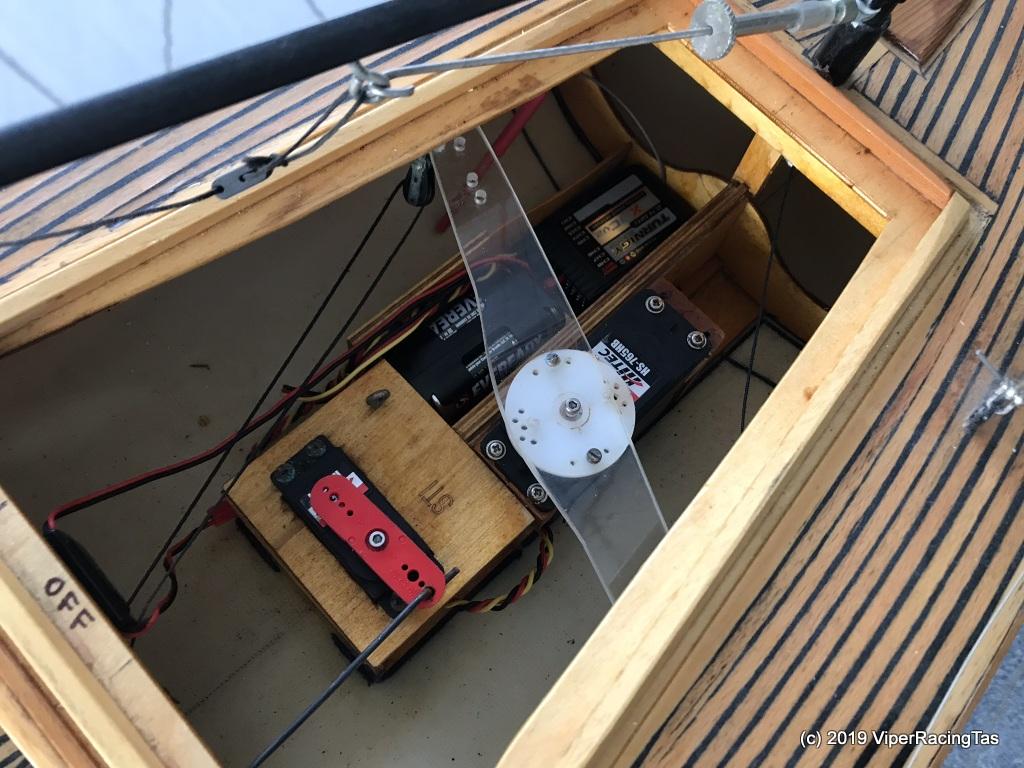
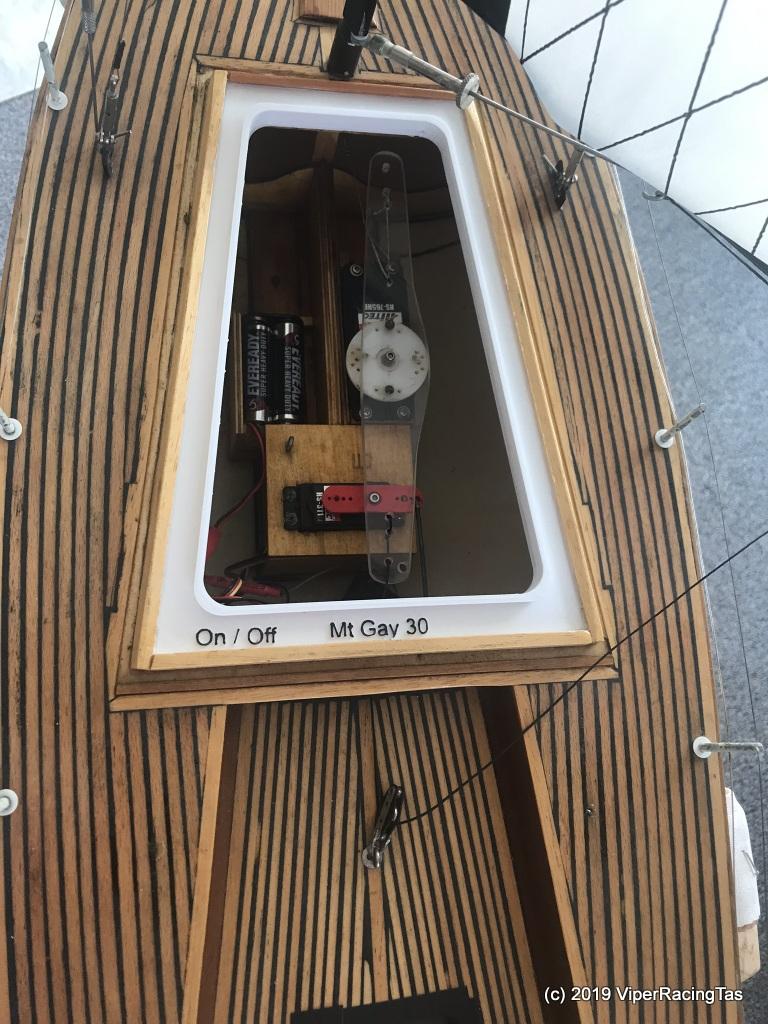
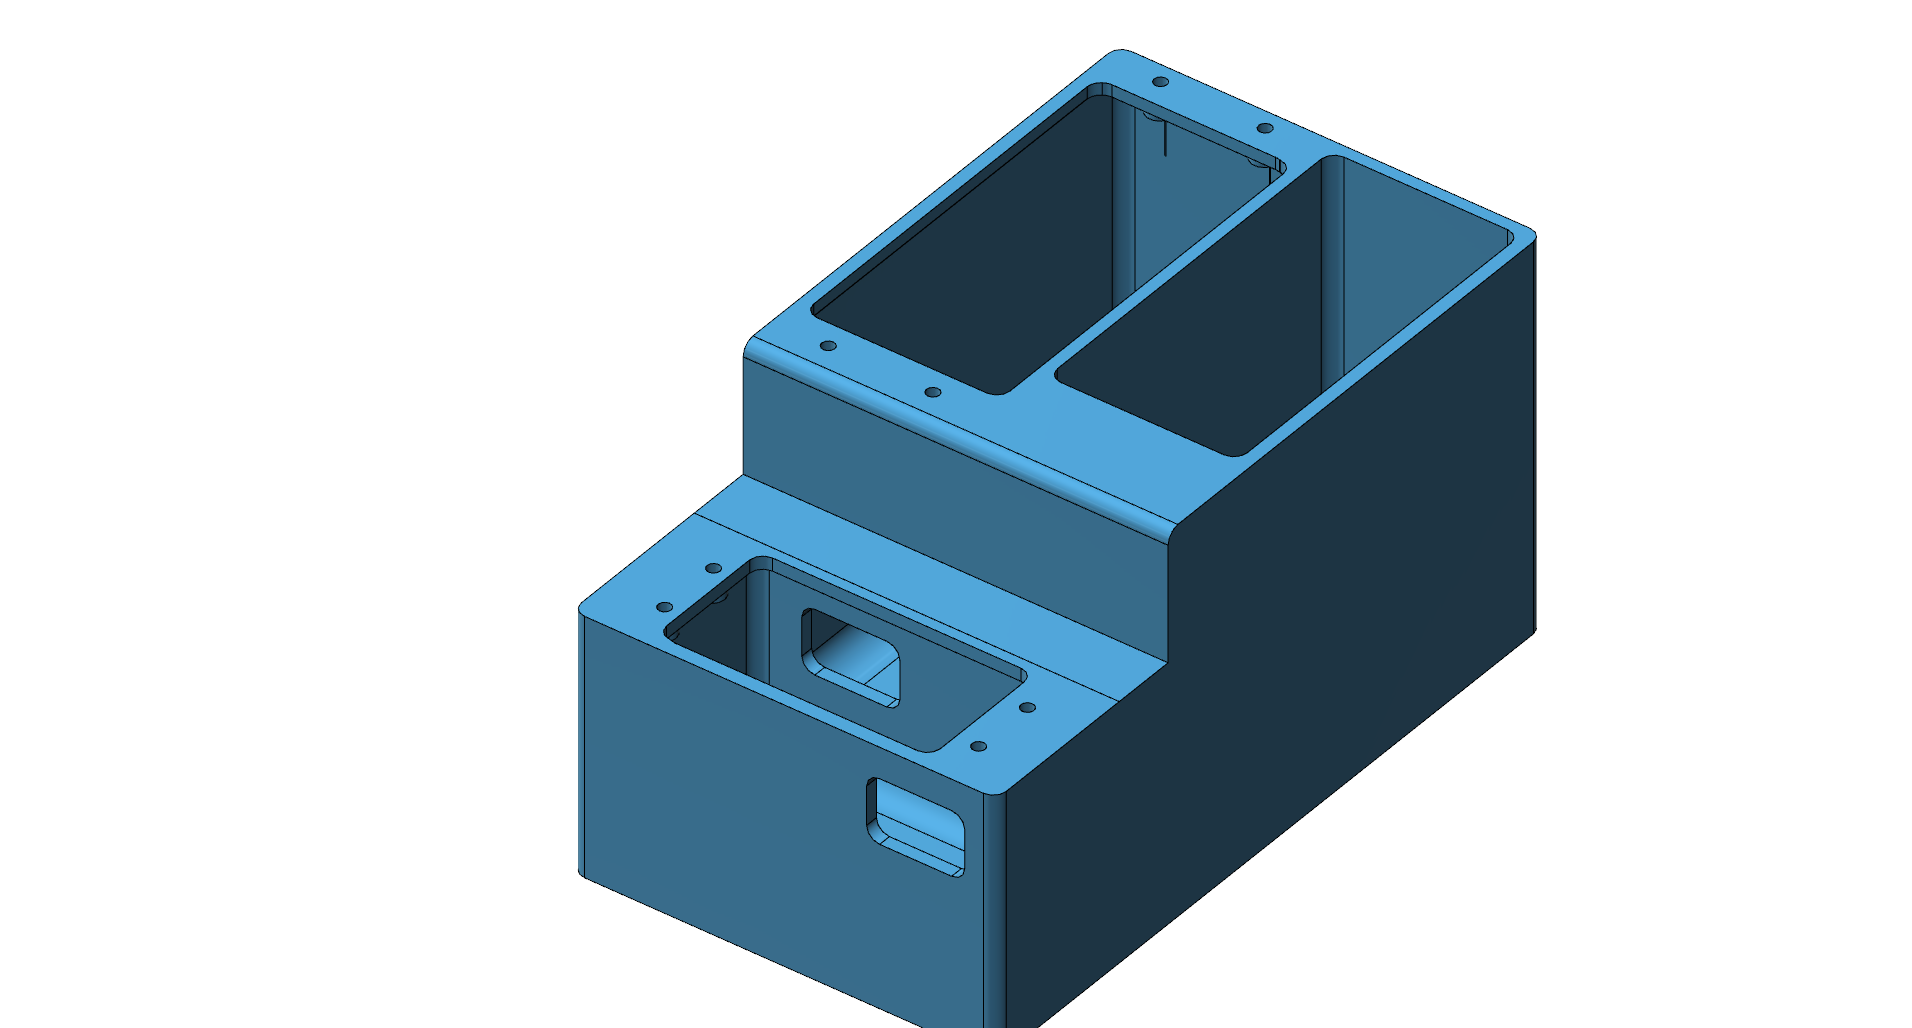
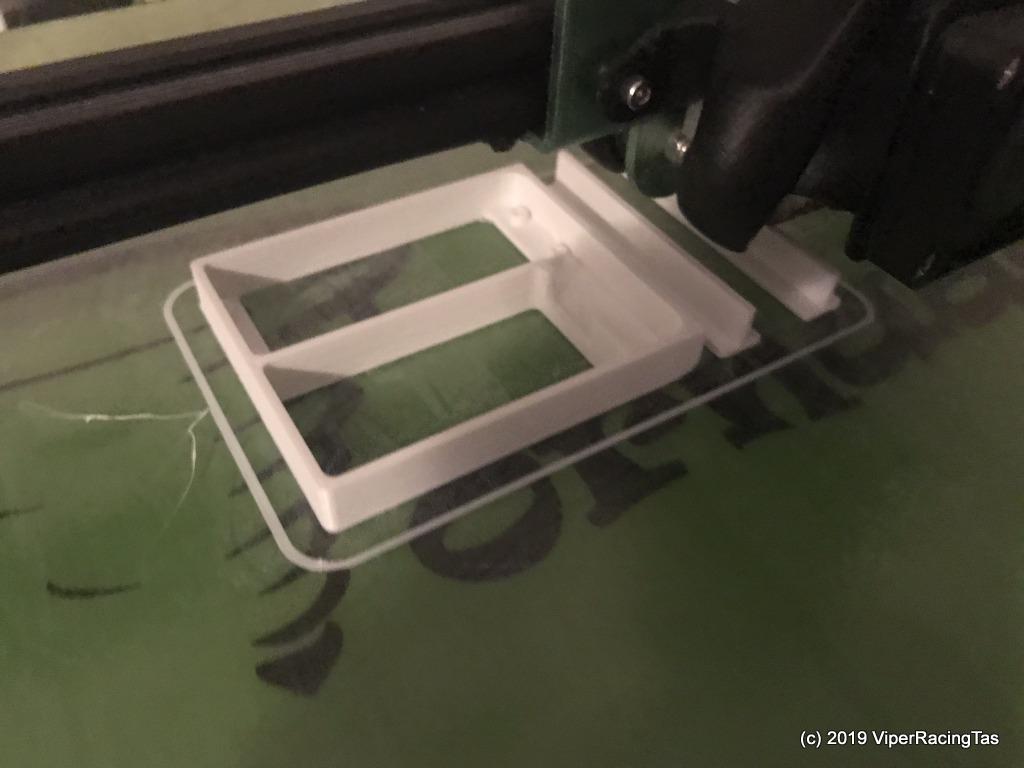
Got the servo box designed & printed (10 hr print) yesterday so hopefully get the servos fitted & all reinstalled today.
If I got the measurements correct there should be room for both the sail winch & Rudder servo, as well as a 5 cell AA NiMh battery pack.
-
17 July 2019 at 15:53 #3110
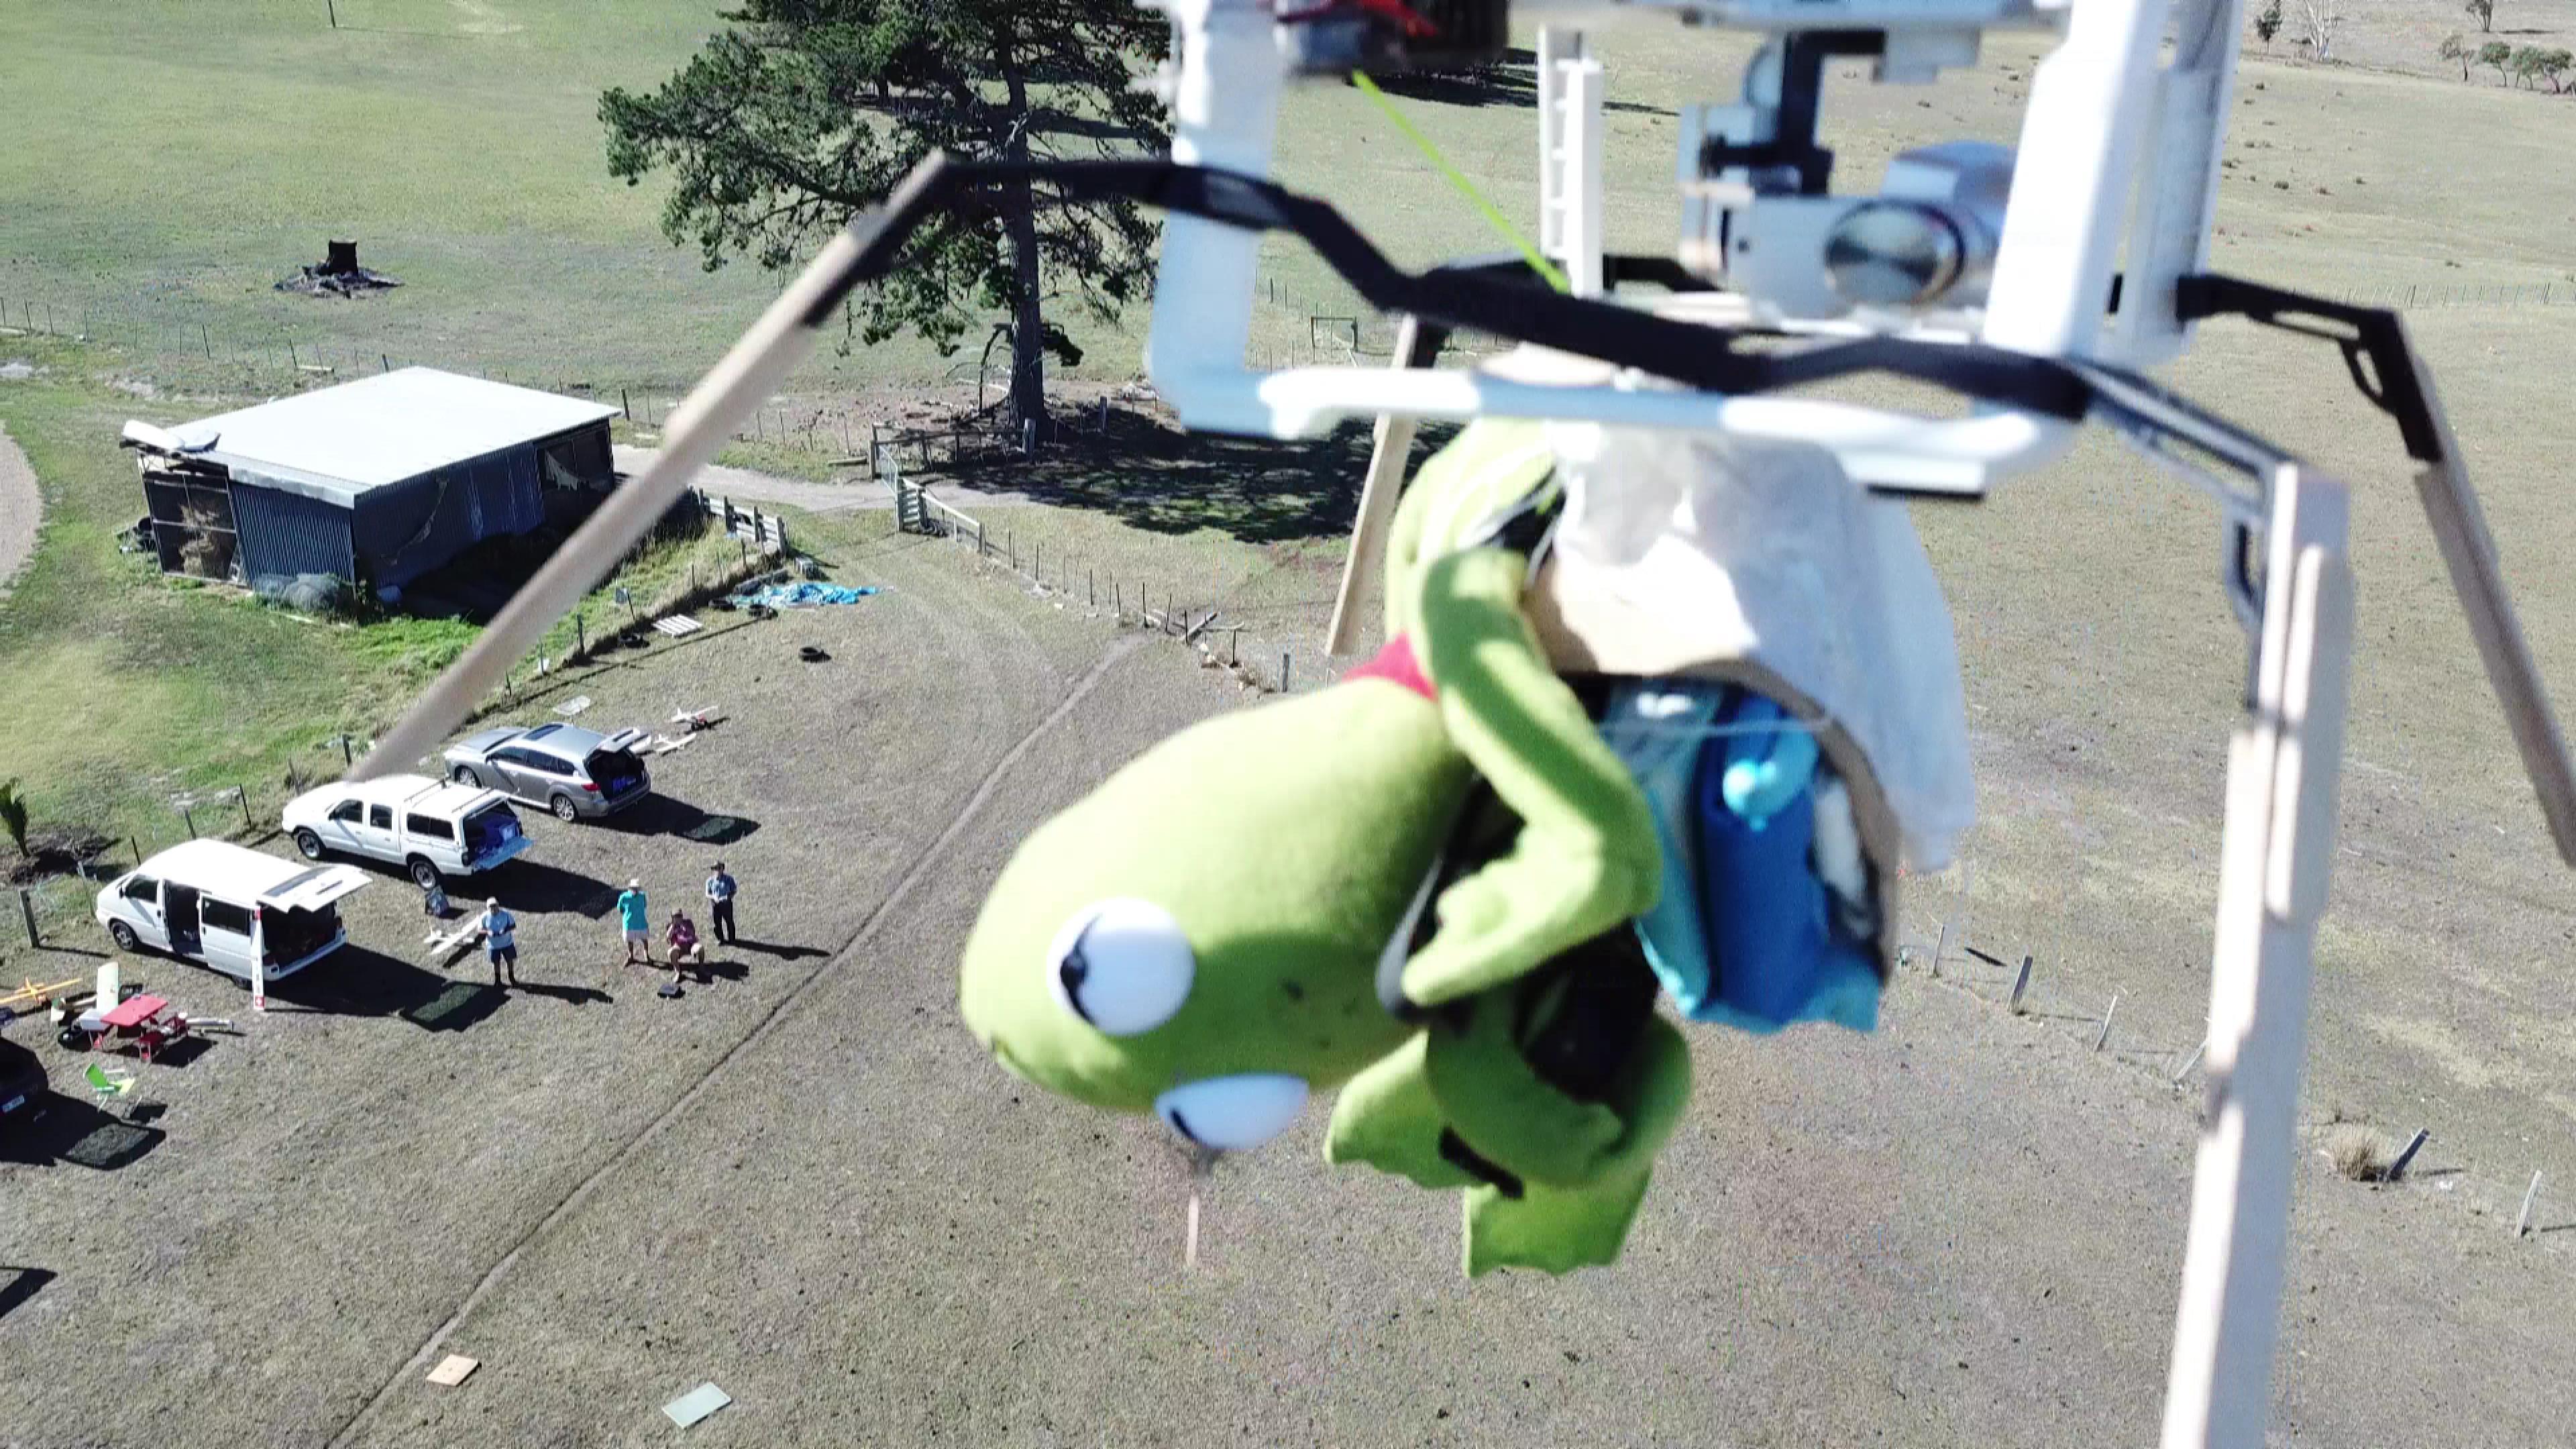
Thanks for the invite to the forum Pred. Trying to catch up with all the goings on over there in Tas. The forum seems to cover your local groups RC adventures well. As you are aware I am more theory than practical and don’t do much sailing here in WA. Hopefully that will change. Enjoying this upgrade of the Mount Gay 30, especially how new technologies fit in to the modelling process. Look forward to when its on the water, better keep it away from any fast travelling media boats on the canal. If we get back to Tas will put on the list a visit to the canal although after a recent video it seems a bit dangerous with that drone attack.
-
17 July 2019 at 16:09 #3112
No worries Tug & welcome to the forum.
I made a slight stuff up with the servo tray so am just in the process of printing another (hopefully correct this time) one.
This time I remembered the step down for the rudder servo.
I had Ron B (of Ron’s Reef fame) over this morning with his V2 Mt Gay 30 that he is also in the process of rebuilding. Have supplied some ideas & printed a couple of bits for him so hopefully we will have 3 on the water before not too much longer.
Ah yes, Bad Angel & his drone attacks, too much spare time on his hands methinks.
-
-
17 July 2019 at 18:17 #3114
ARRHHHH Tugboat dear boy I was the recipient of that vicious unprovoked attack I admit it looked quite devastating …but ….he missed the vitals not only is he a bad shot he cant fly either ohhhh buggar don’t think i should have said that ……. just remembered his message at the end of the video oh well such is life I also am following predators rebuild after the sailings on the pond “necessary improvements” great to have a 3d printer ay anyway welcome to our group you should do some some posts of your mountagay boat to …….. Regards kermit la frog
-
17 July 2019 at 22:38 #3116
Thanks for the welcome Pred and Kermit. Will post a bit about myself when I get time. Know some of the names on here from Preds YT channel and ShipShape. Kermit I noticed that the other skippers did not come to your defence when under attack. More interested in their BBQ. Bit of a worry. More of a worry was just after I posted my wife told me their was a drone hovering overhead. I stayed inside.
-
18 July 2019 at 13:29 #3117
Tugboat cobber to set you strait on the “shoot up” we had moved from our flying field to lauderdale canal for our usual BBQ now there is a pecking order in our group an its an age thing predator being the eldest ( 81 )starts the BBQ bad angel is second (79) so on an so on ….any one under 75 is a newbee (that’s me at 71 ) I’m the only one……. any transgressions by a newbee is quickly stomped on by the elders my fault was I used bad angels sauce on my hamburger with out asking………. as in the pecking order you don’t just go and sit with them you wait until invited so whilst waiting I wandered onto the grass and as you saw the rest is history and you asked why no one came to my assistance , a lot of cars going past slowed down but I think they were intimidated by the rough necks at the BBQ to stop…… unless predator raises his finger no one moves to render assistance (such is the power of our leader ) Im not one to tell ferfies trust me this is the truth ……. getting back to you TUGBOAT this name conjures up a vision of a portly fella true? just curious Nick names reflect a person like” bad angel” predator ..me ..UNCLE G so tugboat that can be a start to your first post…… look through our site and enjoy our fun Regards…. kermit la frog
-
18 July 2019 at 13:48 #3118
The ways of the world (according to the frog) are strange and wondrous things, just a shame how the truth of it all gets lost in the telling!!
I think his avatar may explain a lot, but we love him just the same.
-
-
18 July 2019 at 14:36 #3119
WELL DONE PRED TOUCHE
-
19 July 2019 at 20:11 #3126
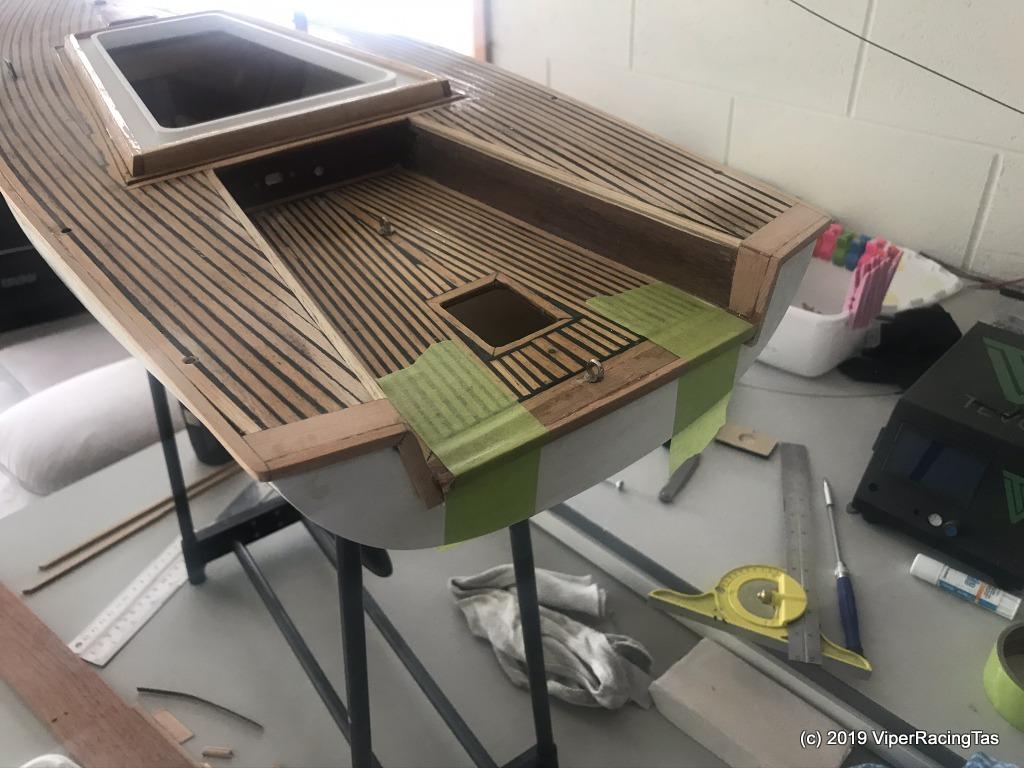
Continuing right along with the build,
Servo Box in the midst of printing
Note the two support bars for the stepped rudder servo section.
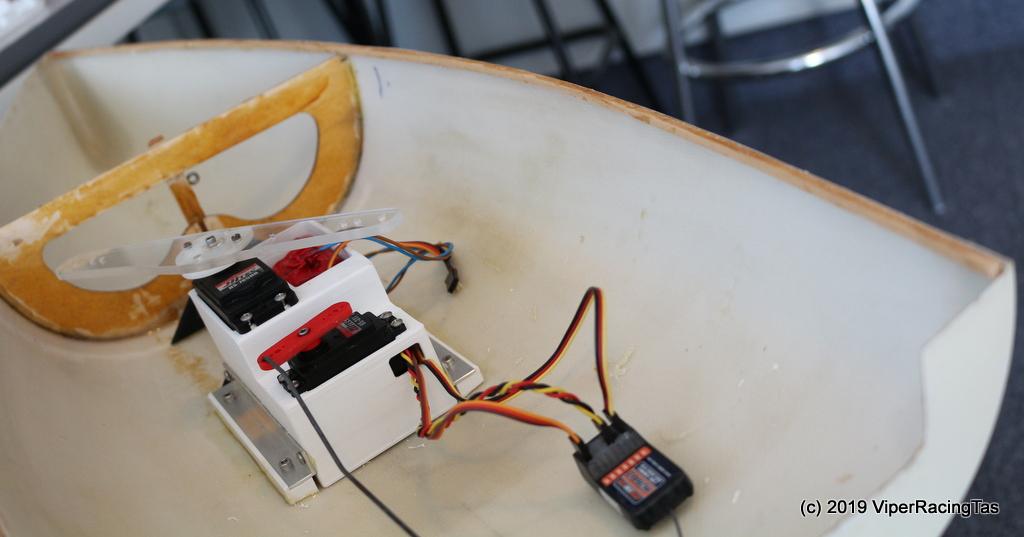
Servo box & mounts installed, just sorting out the timber to re-attach the deck
Once the deck is reinstalled the RC receiver will be relocated under the centre of the rear deck well out of the way of any water that may splash in.
Close up of Servo Box & Mounts.
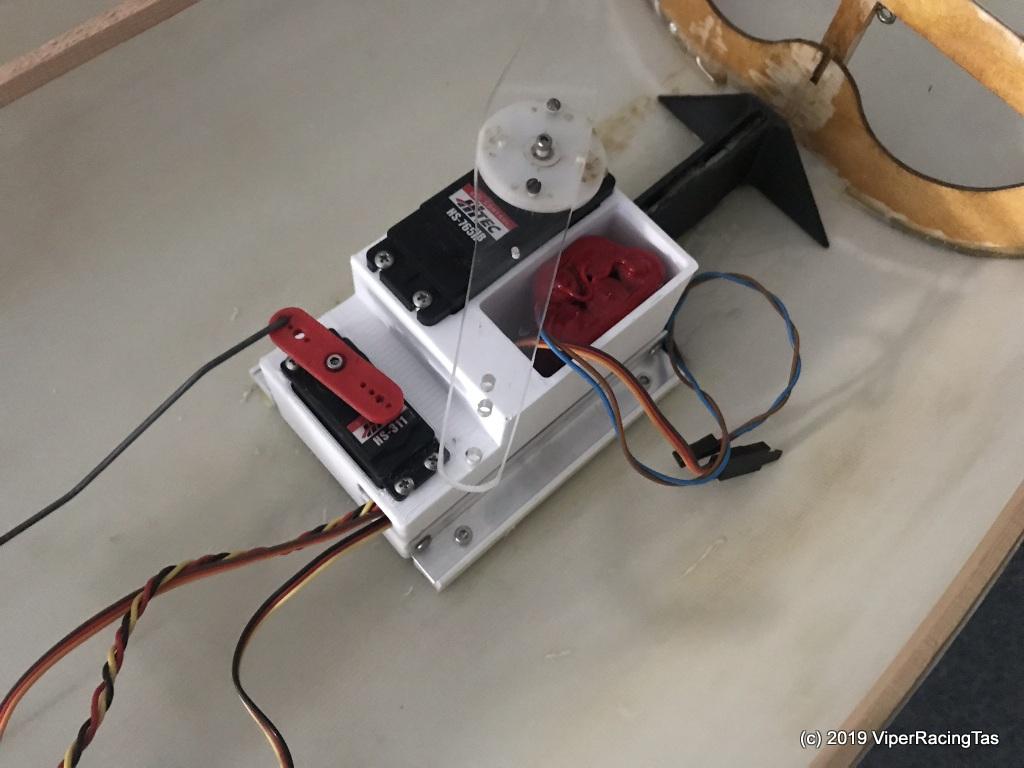
The Servo Box mounts are 12mm x 6mm x 110mm 3Dprinted rails with 3mm Nyloc nuts moulded into the bottom. These are then epoxied into the hull.
The 12mm x 12mm x 110mm aluminium angle is epoxied & screwed to the Servo box & then screwed to the mounting rails with 4 only 3mm x 10mm Stainless Steel Cap Screws.
This makes for easy removal of the entire servo tray with everything intact by just removing the 4 mounting caps screws.
Need to make up a timber strip cutter in the morning to rip the deck mount strips down to the correct size then the deck refit can start.
-
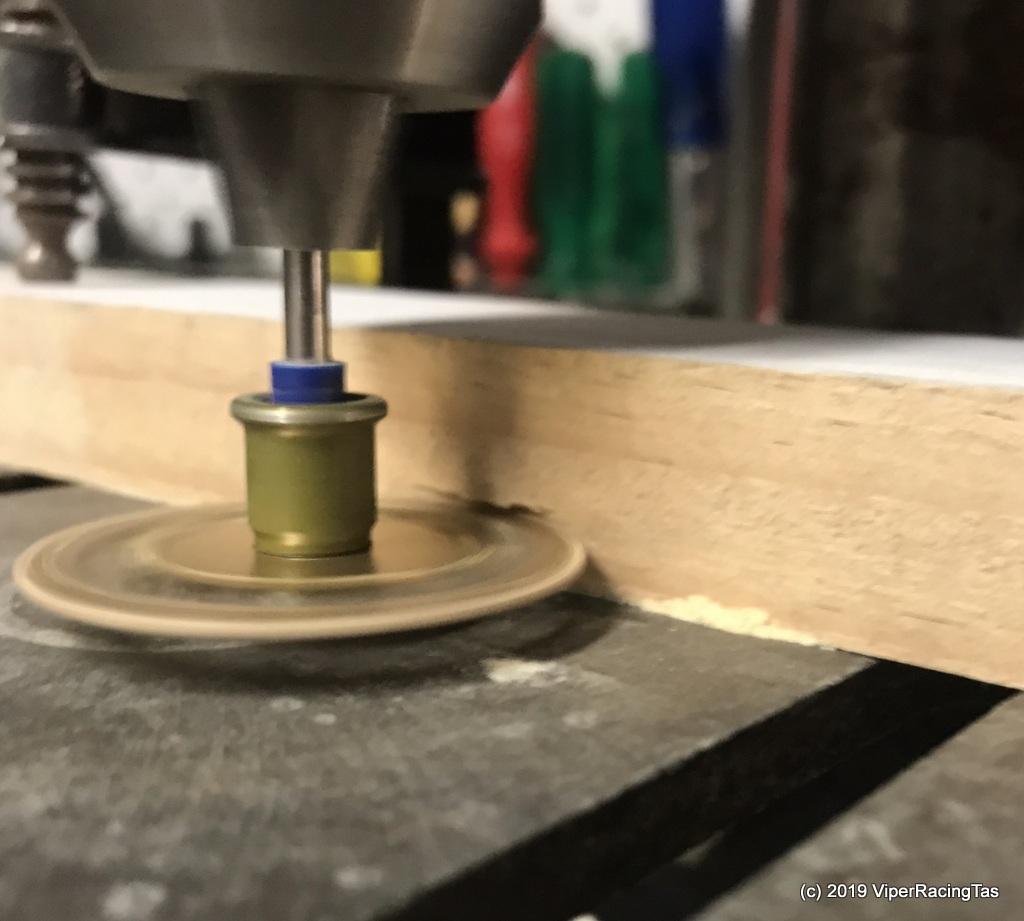
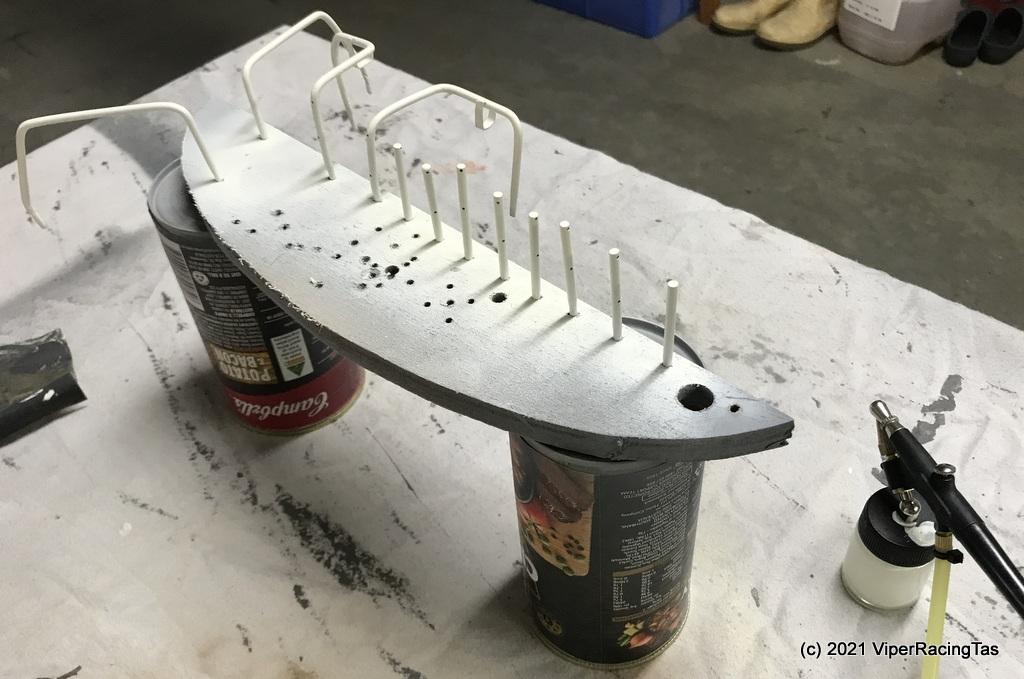
21 July 2019 at 14:45 #3134
Got the Plank Strip cutter up and running today. Ended up with a Dremel timber cutting blade fitted to a Dremel Ez Lock quick release mandrel.
Mounted it in a drill press rather than the Dremel and then just a matter of setting the plank thickness as the gap between the blade & drill plate and using a pine block to keep the timber pressed against the blade while cutting.

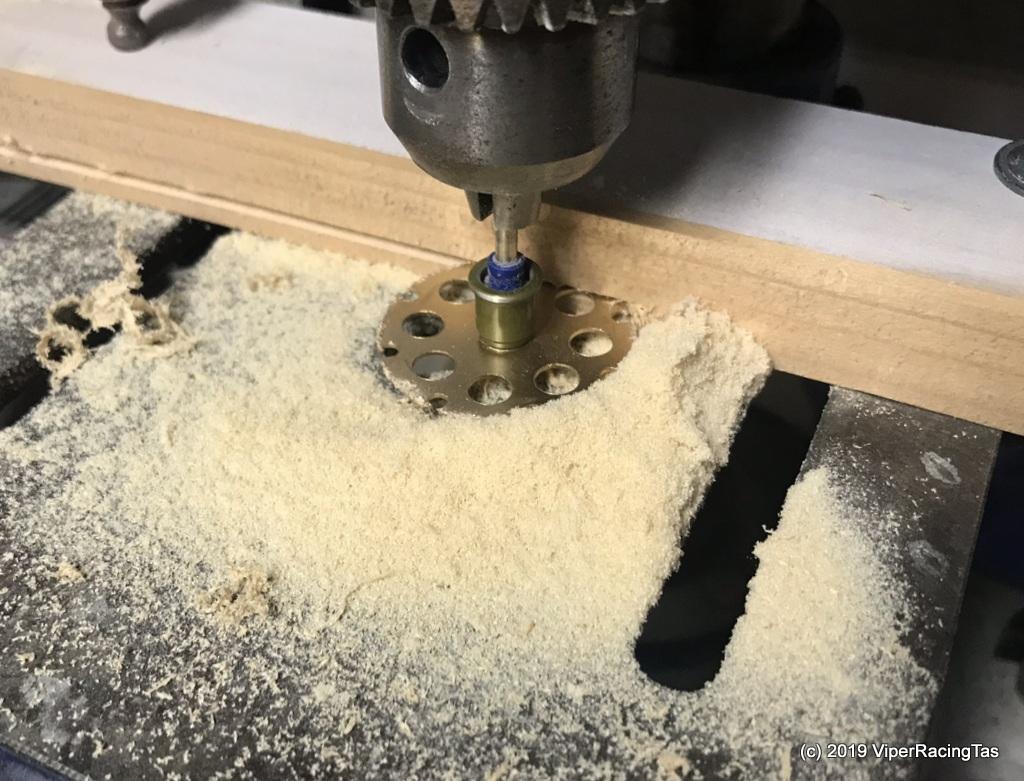
4mm x 4mm strips are required to mount the deck as there is not much clearance between the hull & the safety rail posts. As long as its well epoxied & sealed all should work out OK.
Starboard strip has been fitted & epoxied, now for the Port side & the stern
-
21 July 2019 at 17:29 #3136
Following this build with interest Pred, well done on your progress. How the use of the 3D printer as a modelling tool is of interest. It definitely produces a very well professional product to exact dimensions. Mrs Pred missing a few pegs??? Kermit I will start another topic to answer your questions, leaving this topic for Pred to continue his build.
-
21 July 2019 at 18:02 #3138
Yes, just a few pegs Tug, I ran out of spring clamps.
-
-
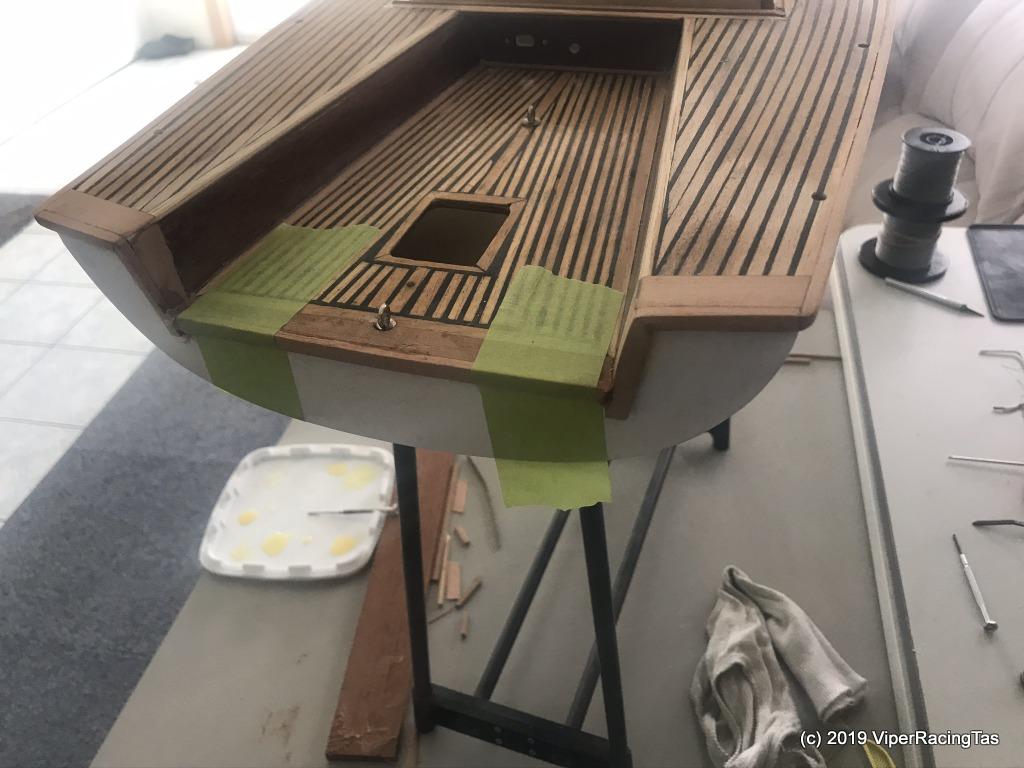
21 July 2019 at 17:59 #3137
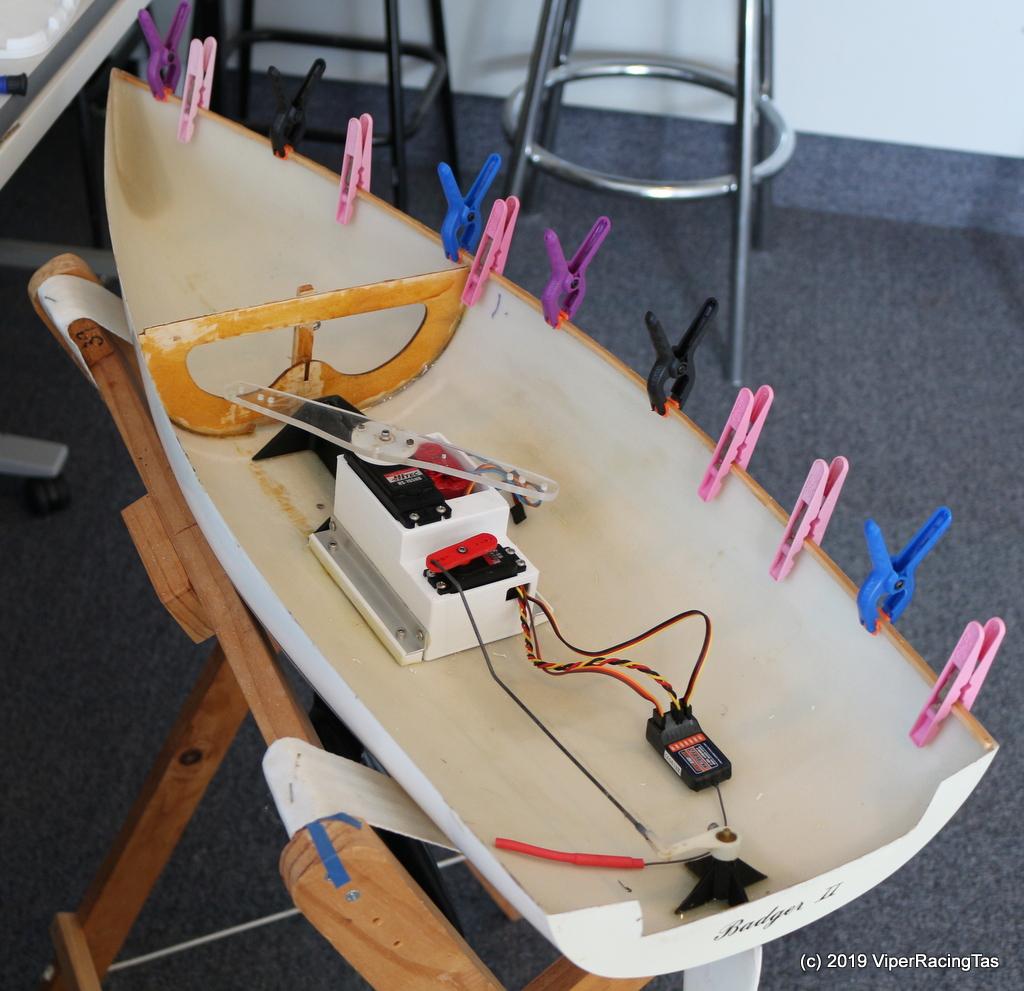
Port side deck strip now fitted & I’ve started to tidy up the deck ready for refitting.
All the safety rails & posts have been removed along with the majority of the deck rigging fittings. A quick sand down & tidy up and the deck should be ready to go back on (and hopefully not leak!!).

-
2 August 2019 at 20:36 #3207
About time for another update.
All the deck mounting timber has now been replaced in the hull, the centre bulkhead has been built up so that it will now support the deck and the whole interior, including new timber-work and the underside of the deck has been epoxy coated.
Next step is to refit the deck
-
23 September 2019 at 15:00 #3406
My how time flies, it is almost 2 months since I refitted the deck to the Badger II and NOTHING has been done to it since.
Been distracted for the last couple of weeks rebuilding a DF65 (ex Hoppy)
 but now that is finished, except for a set of A+ sails, it’s time to get back to the Badger.
Today, after sanding the edges of the deck to better match the hull it was time to manufacture & install the rubbing strips to hide the deck/hull join.
Cut some thin strips of timber with the previously built strip cutter then changed to a curved router cutter to round over the bottom edge of the strip.
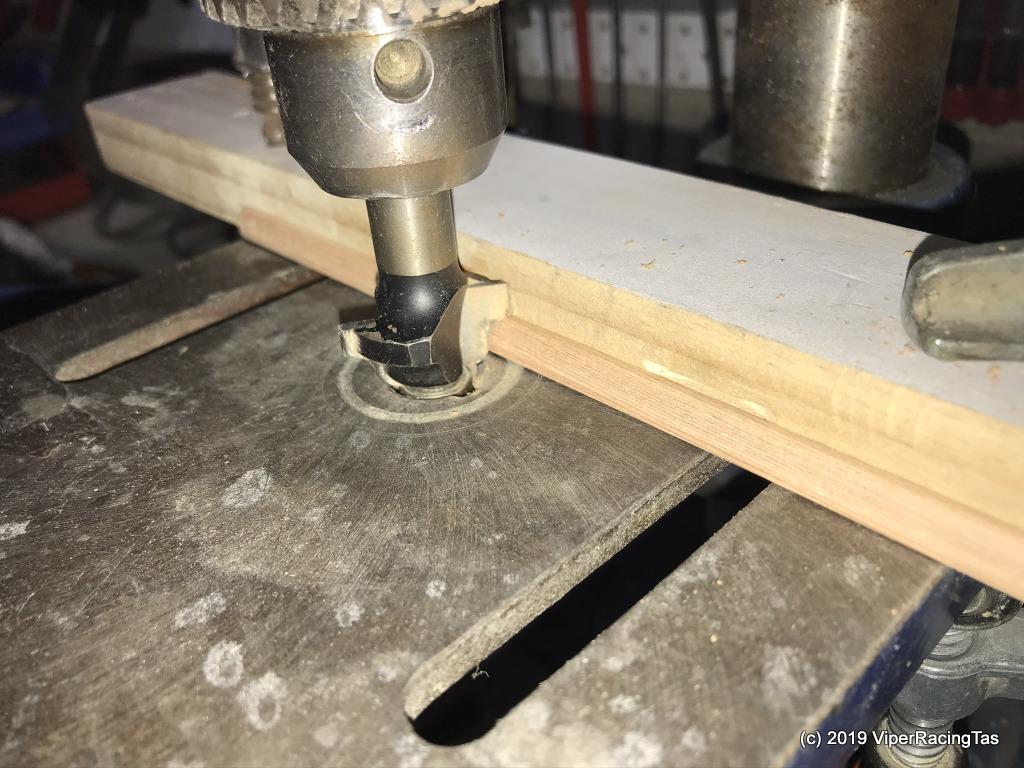
Started epoxying the first strip into place by attaching the bow end then once set epoxying the rest into place. I think once finished it should look pretty good.
Time to get back to the gluing!!
-
23 September 2019 at 23:24 #3407
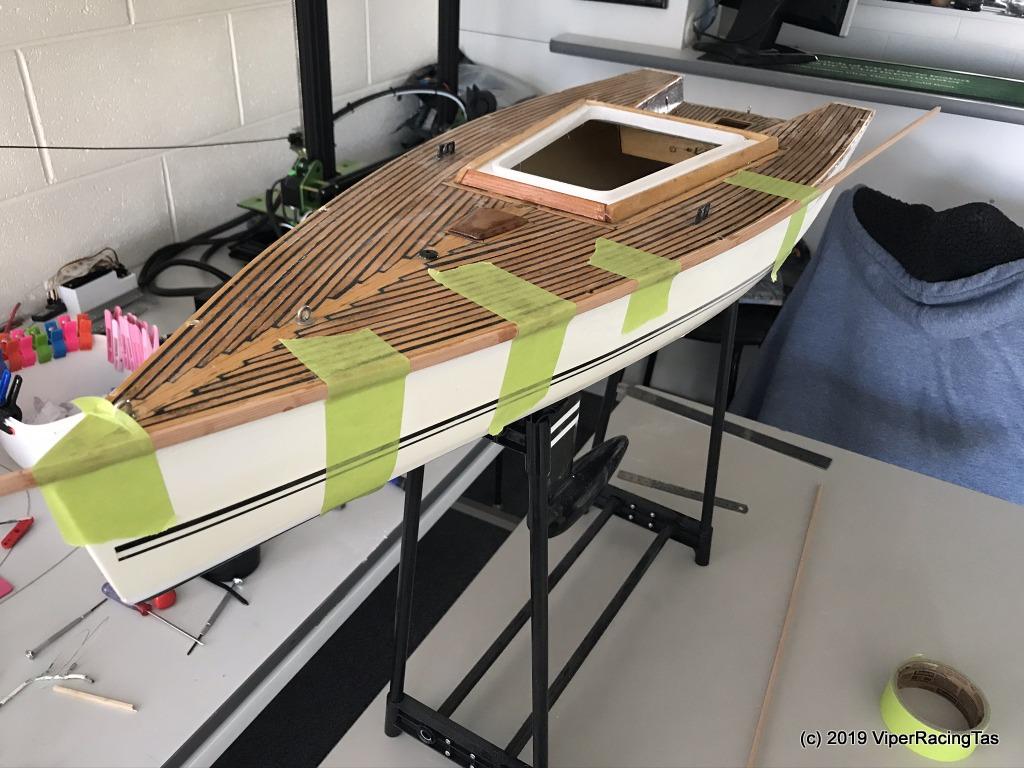
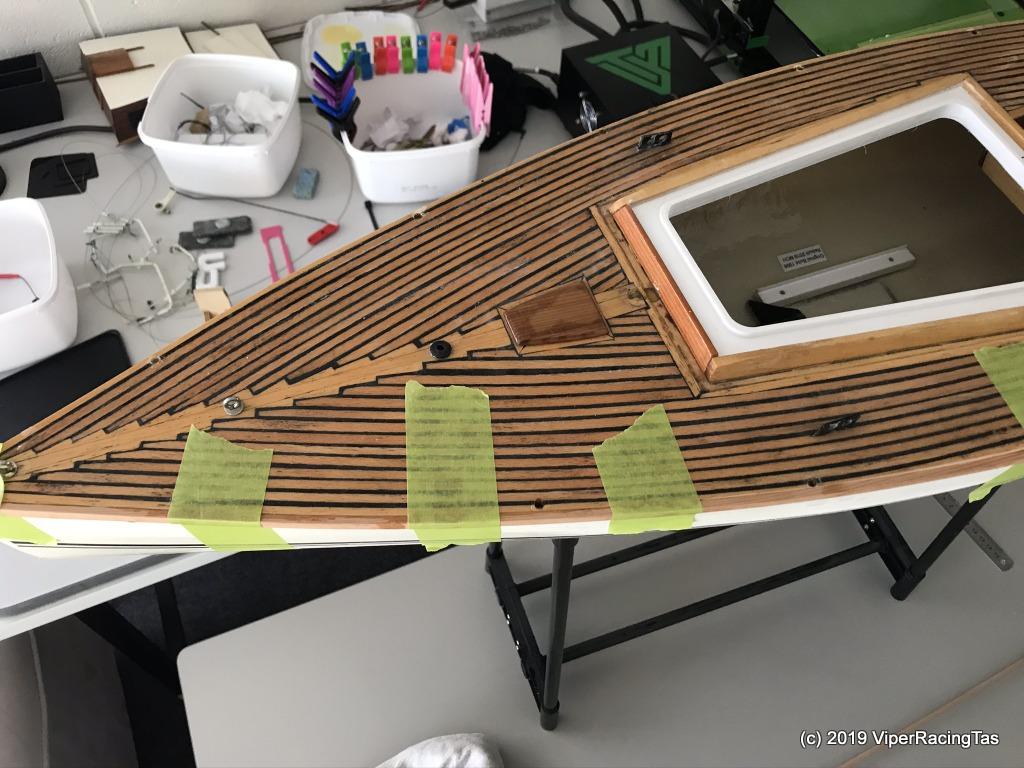
Nice build Pred, looking forward to seeing it on the water. Green Masking Tape??????????
-
25 September 2019 at 21:04 #3432
Green Masking Tape, well actually its Painters Tape but it is a lot easier to remove than the standard variety.
Got a bit more done today filling in the missing/damaged deck planks and have started to sand all the new work back into the correct shape & thickness. Will post some updated pics tomorrow.
-
-
25 September 2019 at 23:05 #3433
It was not the type of tape but the colour. Sorry just my attempt at humour. Keep up the great build.
-
26 September 2019 at 13:36 #3435
Ah yes, the penny finally drops
-
-
26 September 2019 at 10:39 #3434
TUGBOAT DEAR BOY yes I noticed the green tape (I think he is trying to get in my good books ) your’v been quite for a while cat got ya tongue after Tuesdays sail i’m not all that happy with the buggar every one is going like mad to get my coveted position he and mudflats were very serious contenders but I outfought predator for second it was rough /dirty /conniving just the way i like it I THINK NOW he knows how serious I intend to keep my place I think he will give up an play with the podium crowd HIS USUAL MOB any way good to hear from you please keep on stickin (HUMOUR ) it to pred as I know how much he enjoys it HAVE A GOOD DAY COBBER BUGGAR CAPS AGAIN sowwery pred

-
26 September 2019 at 16:06 #3436
No, just a lot of things going on, between my wife and myself have been financing the doctors holidays and draining medicare. It will be school holidays for the next few weeks so that will keep us busy, probably no sailing as all the grandkids think it is to slow, not me it is very relaxing when I do get on the water. They prefer RC buggies, which is a lot of fun for them but keeps my pockets empty with all the repairs. But that is a cost I am quite prepared to cover as it gives us great times together. Have a few things to post and will see how I go over the next few days. You are a bit harsh on Pred, always been a gentlemen and willing to share knowledge from what I have experienced. But in the heat of battle we can all change I guess. Hopefully one holiday we will come your way and see for myself.
-
26 September 2019 at 16:55 #3437
A BIT HARSH you say if you knew how hard it is to maintain my place at the pond harsh isn’t the word The ol fella is as you say ” a gentleman ” but that’s not an excuse to attempt to take my sacred place i’v scooted others out he’s gotta go to as for sharing knowledge I to do that just last Tuesday I shared some with pred I told him to” buggar off ” THERE CAN ONLY BE ONE NOW to show my gentler side if you do decide to come to the the land down under we have a shack at dunalley look it up on google earth 32 craigs hill road your welcome to use it as long as your here ( should save a bit from the purse I recon ) but there is a price you have to shout an rave as I cross the line at the pond not difficult I do it all the time
-
26 September 2019 at 18:17 #3438
Thanks for your kind offer Kermit, you never know we might come back again for another look at Tas. Do I have to dress in green as well? Have chatted to Pred over a number of years, cant imagine there is the side you are referring to.
-
26 September 2019 at 18:38 #3439
Don’t worry about the Frog, he’ll get over it. Just doesn’t like anyone stealing his coveted Tail End Charlie position, especially at the pond.
Anyway weather permitting we will be back to flying next week (at a new field) and he can then take out his frustrations by throwing Kermit & Miss Piggy out of his multi copter at 1000 ft, more often than not with malfunctioning parachutes.
-
-
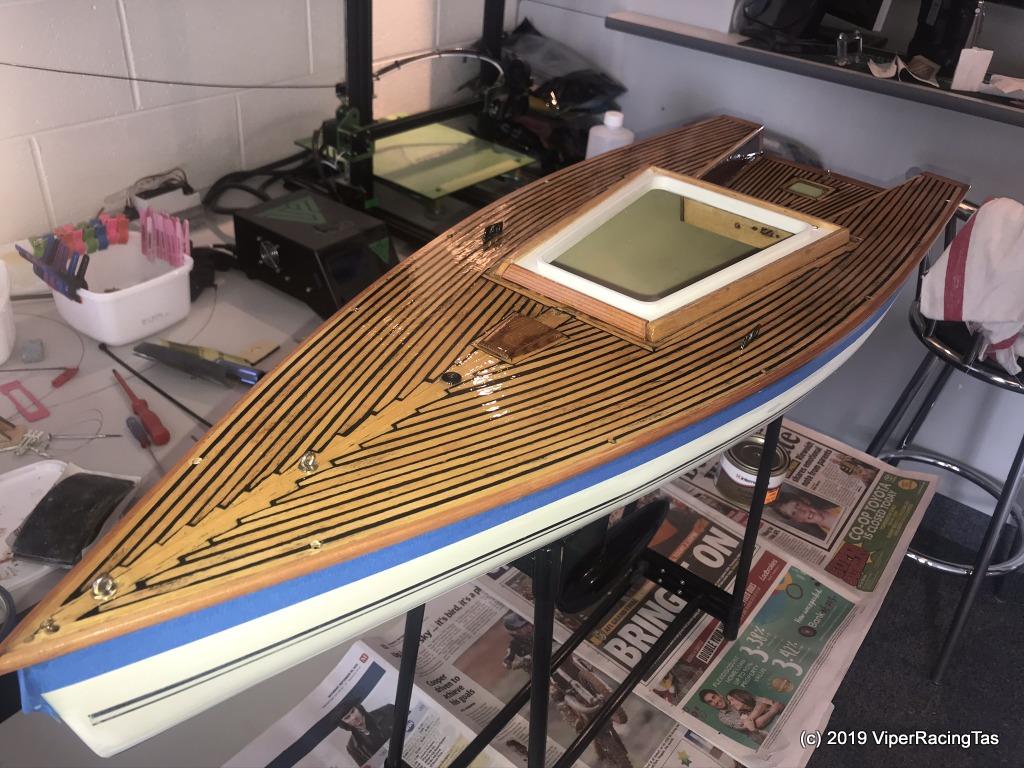
29 September 2019 at 15:04 #3451
Finally got the last pieces of planking epoxied into the deck of Badger II, now to finish off all the sanding & filling ready for a couple of coats of Spar Varnish.
-
29 September 2019 at 18:50 #3454
yes well there will be no ohhhh ARRRRRH doesn’t it look great or such words until I get a written apology or verbal stating that you do not intend to further your advances upon my position at the pond MR predator THE CHOICE IS SIMPLE ohhhhh your way or silence now go play with your mountagay and reflect on the decision you will make
-
29 September 2019 at 19:45 #3456
Kermit, my little amphibious mate, you keep telling me I am the bigger man (windbreak comes to mind) so yes I will humbly apologise for encroaching on your coveted “Tail End Charlie” position whilst DF racing @ Puddleduck.
In future I will do my best to beat the pants off you and stay in the mid to front of the fleet.
-
-
29 September 2019 at 21:00 #3458
WELL THEN OHHHHHHH ARHHHHHHH NICE work there pred ol cobber mate to tell the truth I thought the wind break part of my story (some time back ) went over the top of ya but nope you have a memory / could come back to bite me so back to the mountagay stop wasting time on frivolous chit chat
-
30 September 2019 at 00:19 #3459
Looking good Pred, that Varnish will make the deck stand out. Now, Now you two I am sure Pred will do his best to keep well away from you on the water Kermit, its in his competitive but fair nature.
-
30 September 2019 at 17:21 #3465
LIKE YOU TUGBOAT I now understand what evil resides in ones mind is like ” in relation to ” the competitive nature of our sport for I to LIKE PREDATOR unknowingly dropped into that void and became MR DARK KERMIT and took it out on poor ol pred I could have killed the poor ol fart at his age anything can kick him off but Iv seen the light ” the force has returned ” AN WERE MATES AGAIN unless he comes near my spot

-
2 October 2019 at 13:49 #3478
Finally the end is coming into sight.
Deck planking repairs & leak sealing is finally completed and the first coat of Spar Varnish has been applied. It will need a minimum of 3 coats with around 36hrs between coats so will take at least a week to finish off the deck varnish.
Next job will be to strip the hull of paint and respray then all that’s left is to reassemble & tune.
Gee, it may even make it back on the water before Christmas but as we start flying @ “The Field” (our new flying site) tomorrow the poor old Badger II could be on the back burner again for a while.
-
11 October 2019 at 14:49 #3532
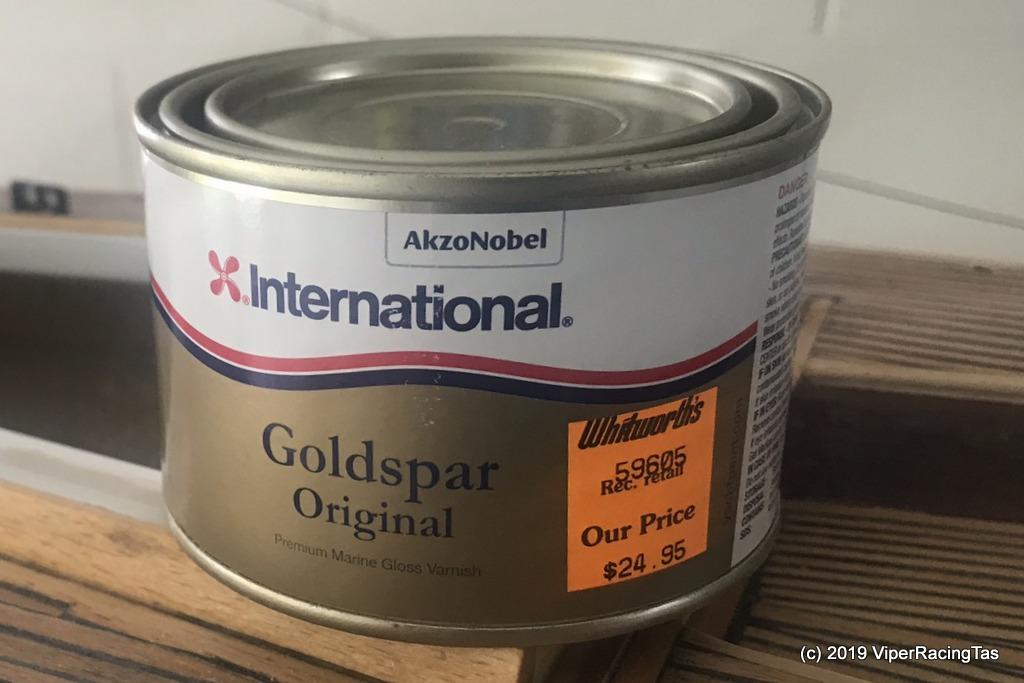
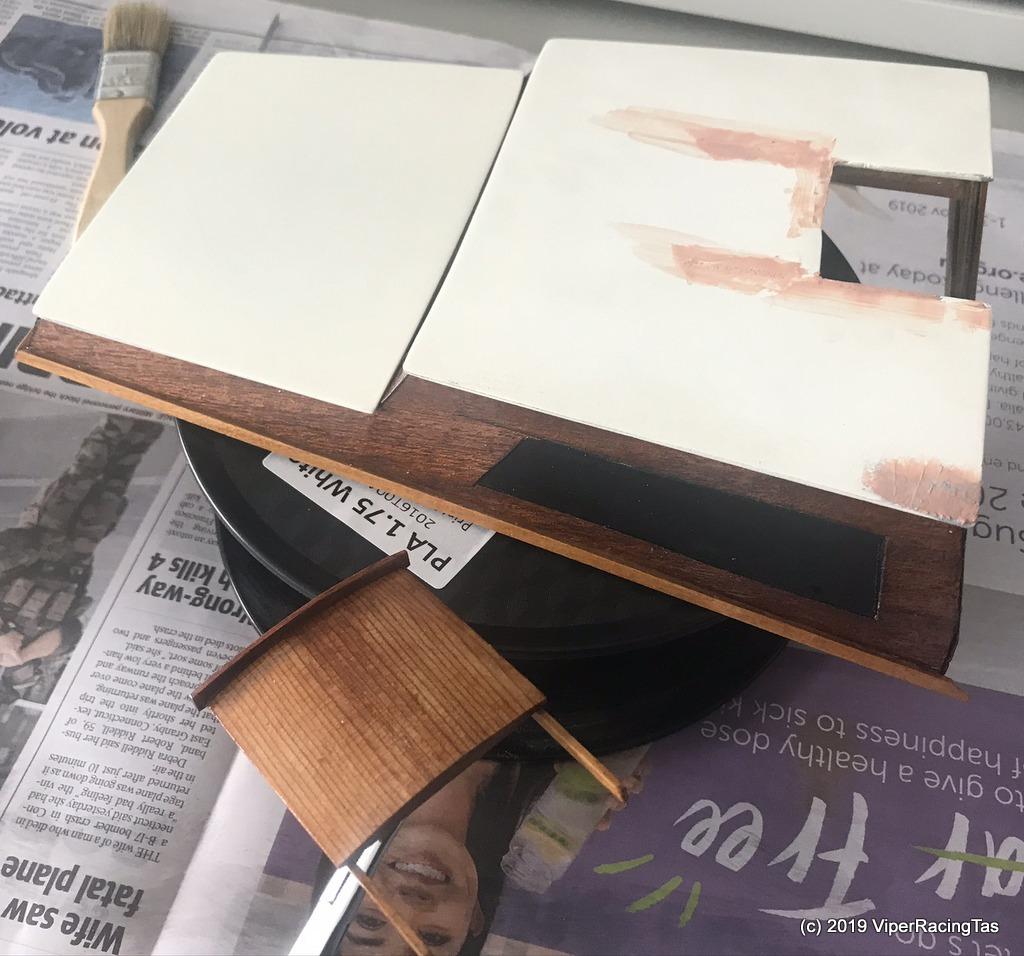
Three coats of Spar Varnish have now been applied to the deck and that is now finished and ready to prep & paint the hull.
Thought I may as well repair the damage to the cabin hatch cover & re varnish the cabin walls before starting the painting.
That way I can spray the hull & cabin roof at the same time so less paint waste & less cleaning up.
Will need to apply 3 coats of varnish (recommended minimum coats) so once again that will take 3 or four days depending on the weather but at least the repairs are done & the first coat applied.
-
19 October 2019 at 14:05 #3580
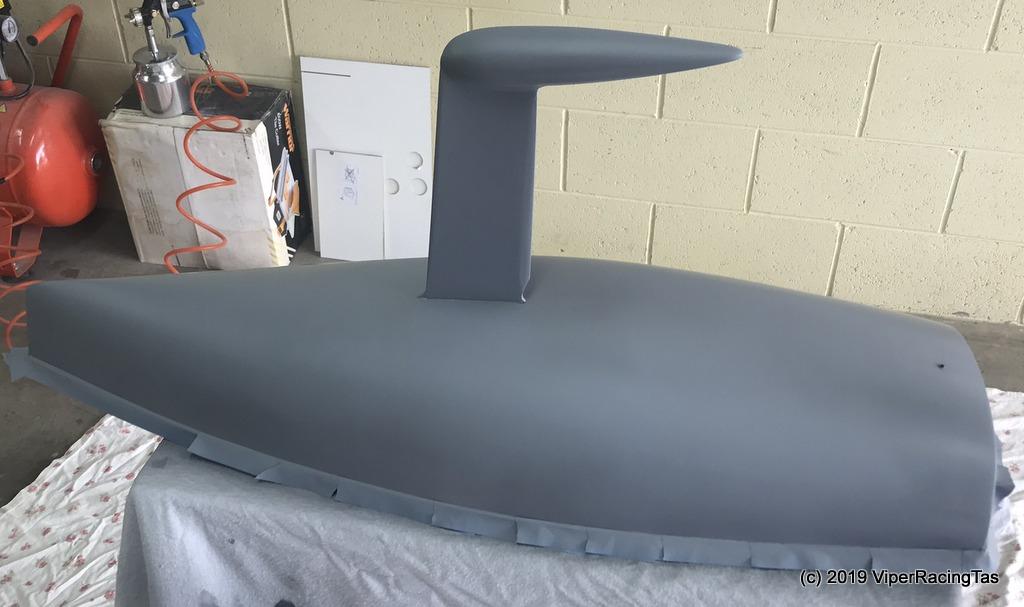
With all the varnishing now finished it is time to start the prep work for painting the hull & cabin tops.
After much scraping & sanding all paint has been removed from the hull back to the gelcoat. This was required as most of the original paint was not well adhered to the hull, no undercoat had been used & I reckon there was still mould release wax on the glass hull which would account for the paint peeling & chipping so easily.
Hopefully this time it will be better.
Half way there !
Well, that’s the hull stripped

Now just need to sand the keel & bulb smooth then give the hull a once over with Wet & Dry to clean up any remaining marks then it should be ready for the primer .
-
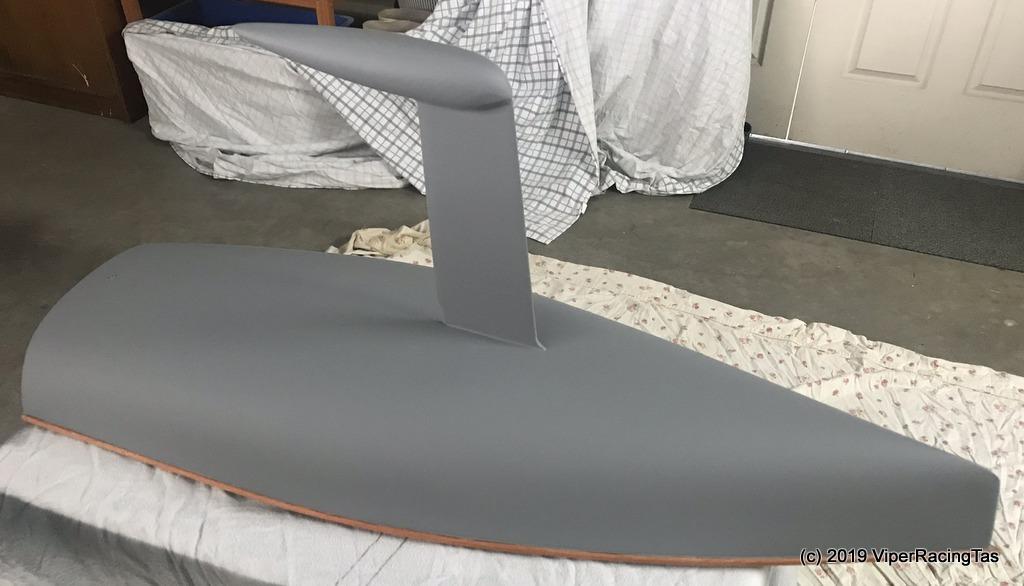
20 October 2019 at 17:20 #3592
Managed to get a couple of coats of primer on the hull today.
If it all sands up ok in the morning I should be able to get the antique white top coat done tomorrow.

-
-
19 October 2019 at 14:33 #3583
YEP IT LOOKS LIKE HALF A GAY NOW ( humour ) bent part )
-
19 October 2019 at 15:11 #3584
What a great Job I can’t wait to see it in the water and a full inspection of all the works you have put into it
-
19 October 2019 at 16:05 #3587
May just get there by Christmas yet!!
-
-
19 October 2019 at 15:15 #3585
why does that frog have to try and make humorous remarks
It obvious I did’nt hit him hard enough when I ran over him and popped a lung
-
19 October 2019 at 16:04 #3586
Moose, you have to remember that Kermit may be just a frog but he is also Clown in residence so we all need to cut him a bit of slack from time to time.

-
-
19 October 2019 at 16:34 #3588
NOW THAT’S GOOD I HAD A GIGGLE WITH THAT it was just a quite giggle as i’m still hurting after being ran over
-
20 October 2019 at 23:18 #3599
Enjoying the build Pred, thanks for posting. Very quiet hobby wise over here. Just finished the school holidays over here and happy to report that all RC trucks survived and returned to the garage needing just some maintenance. As you would know from my previous posts on SS this is a very rare event and I normally have to take out a loan for the repairs. Hopefully some sailing in a few weeks. Is that picture of Kermit before or after he got run over??
-
21 October 2019 at 10:04 #3600
G’day Tug, yes definitely a rare event, judging from previous posts on the matter.
I guess they are getting older & improving their driving skills, or perhaps they are just trying not to stress out poor old Granddad with the endless repairs.
That pic is just Kermit in his BoBo the clown costume.
Ah, bring on summer.
-
-
22 October 2019 at 00:14 #3606
Got it, was not sure if Kermit had just got out of hospital after his accident or was that failed sky diving attempts. Good to read he is back in fine form at the canal last weekend.
-
13 May 2020 at 17:36 #4886
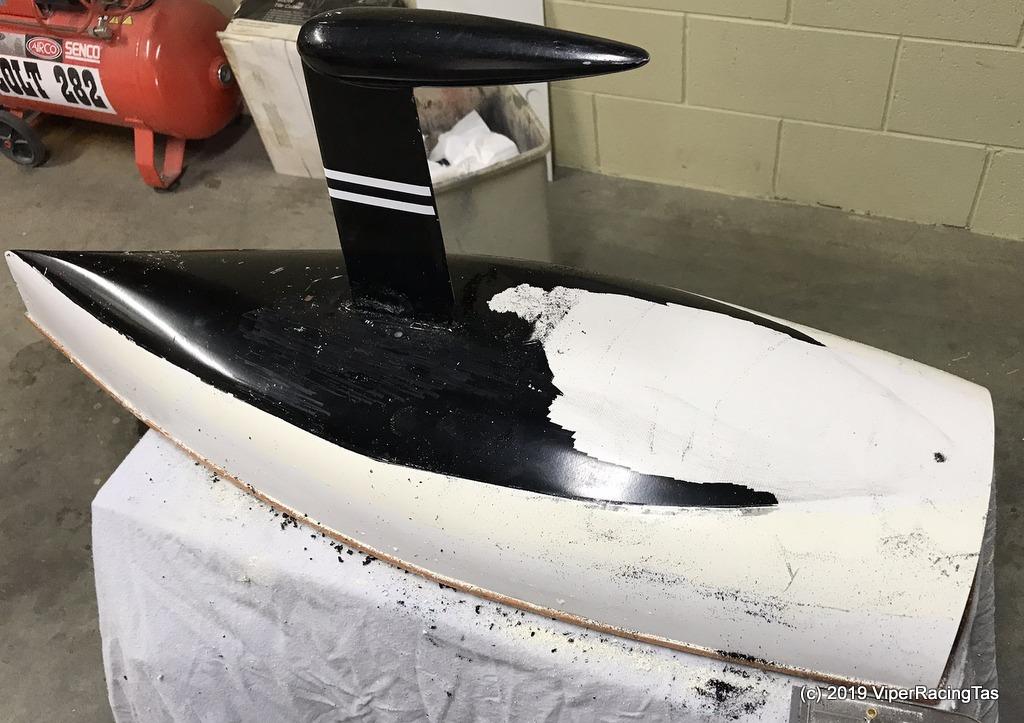
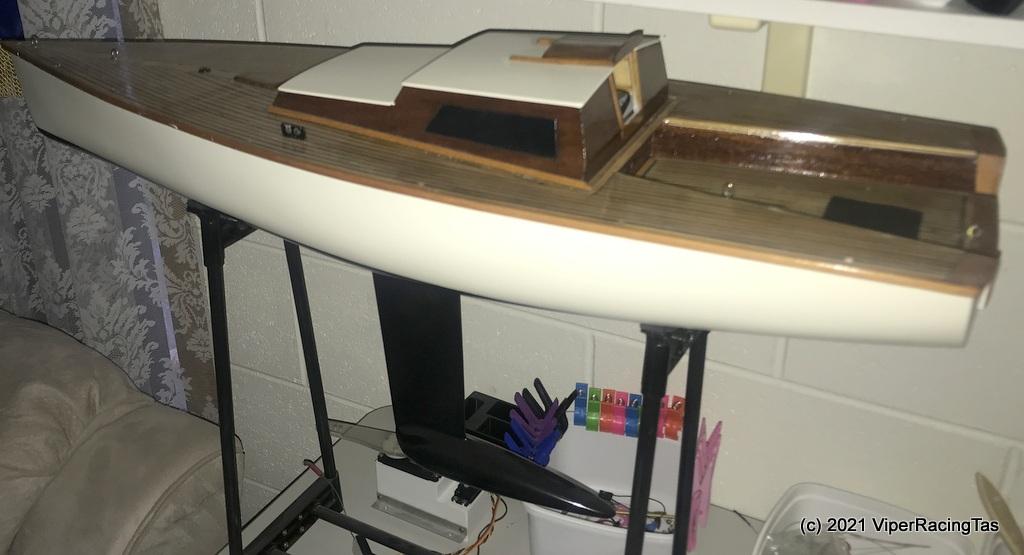
It’s been some little while since any work was done on the “Badger”, in fact just checking back on the last post & it was October 20 when I undercoated the hull.
Today, almost 7 months later, the antique white top coat finally got applied to the hull & cabin top. I chose Antique White as I think it better matches with the age of the vessel & the stained timber work than what Brilliant White (as used on the 10R “BattleAxe” and the IOM “Wedgie”) would. I just took the cabin top to the Spektrum Paints & they did a top class job matching the colour.
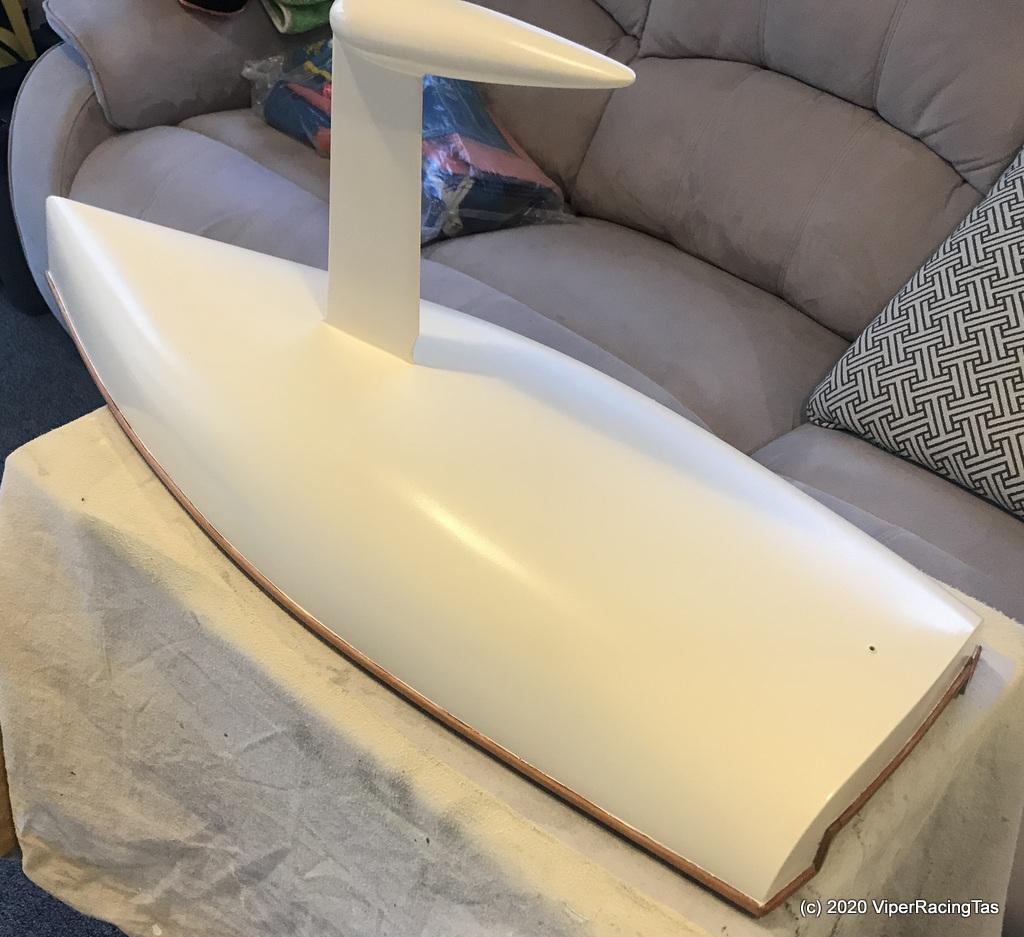
I’ll give them a couple of days (or is that perhaps weeks/months) to harden & then after a quick tidy up around the deck trim, cut and polish and add the underwater black area (to match the original design)
While waiting all the stanchions will need to be sanded & sprayed ready for refitting as soon as the hull is completed.
-
13 May 2020 at 23:54 #4894
Nice job Pred.
-
15 May 2020 at 17:33 #4898
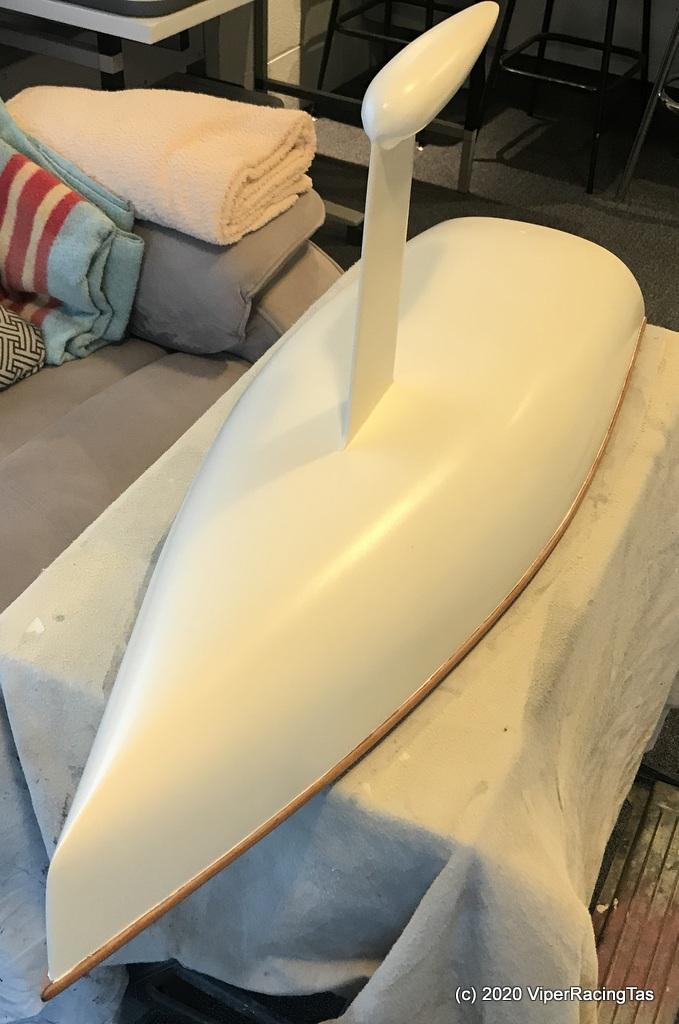
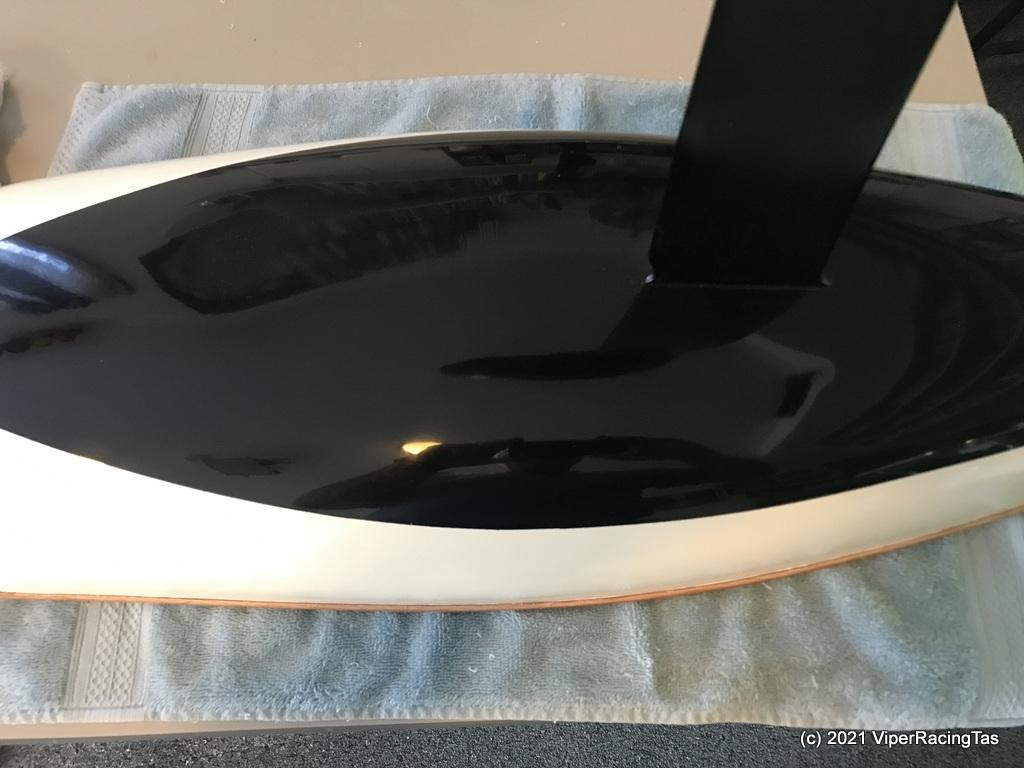
It was such a lovely Autumn day today I figured it was time to finish the hull painting & then do the tidy up/polish etc when the weather turns nasty again.
Three double header coats of Jet Black Acrylic Lacquer for the area below the waterline & the “Badger” is looking like her namesake again.

Now onto all the handrails while the lacquer hardens up ready for buffing.
-
15 May 2020 at 18:13 #4900
wow Mike it certainly is going to be a beautiful boat on the water.
Cant wait to see it sailing again
-
15 May 2020 at 18:20 #4902
YEP that’s nice Reminds me of MR Moose’s toe up in the air
-
17 May 2020 at 18:55 #4906
Looking very good.
-
19 July 2021 at 16:48 #8673
Looking back it in now 14 months since I painted the hull of the Mt Gay and the poor thing has been sitting on the workbench ever since.
Tomorrow it will be time to start again, just need to tidy up a bit of paint trim & cut and polish the hull then final assembly can start. Need to sand & respray all the stanchions then install new safety lines all round but other than that there is not really a lot to do. We have a few days of no flying weather coming up so hopefully it should be finished by the weekend !! (which weekend – well that’s another story.
-
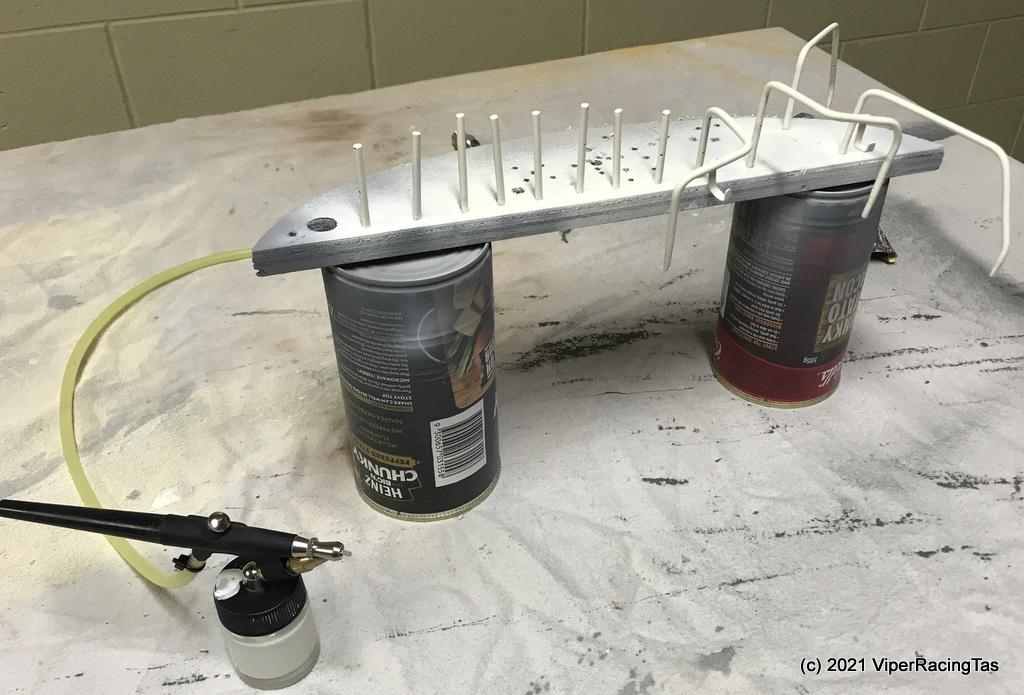
20 July 2021 at 17:06 #8686
Today the paintwork on the hull/deck join was sanded back as the finish was not up to scratch. This time after carefully masking the underside of the deck “Rub Rail” paint was reapplied using the Airbrush rather than my smallest automotive spray gun. This time I’m happy with the finish so a quick cut’n’polish tomorrow & then the stanchion work can start. Will no doubt take a while to clean them all up before repainting.
Must remember to paint the rudder as well as it got missed when painting the keel & underwater area.
By the way Uncle G, I found another of those 30 Mt Gay’s that was brought into Tas way back in the 80’s. I was out at Brian J’s (ex MMACA President) today and he also has a partially completed Mt Gay sitting on his work bench. Reckons he might get back to it one day !
So that is one for me, one for Ricky, 2 for RonB and one for BrianJ and Alan F’s “Little Honda” (that he used to beat the pants off us with @ the canal in the early days of us sailing the “Chinese” RC yachts), but the last time I saw that was at his funeral. Still leaves 24 more out there somewhere.
-
21 July 2021 at 19:00 #8698
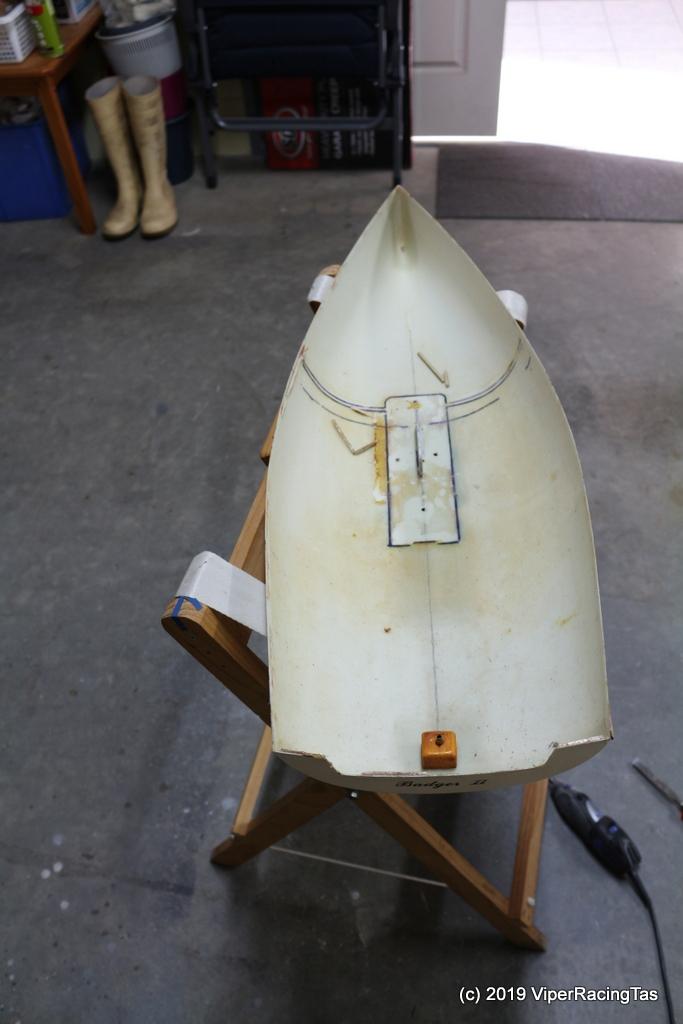
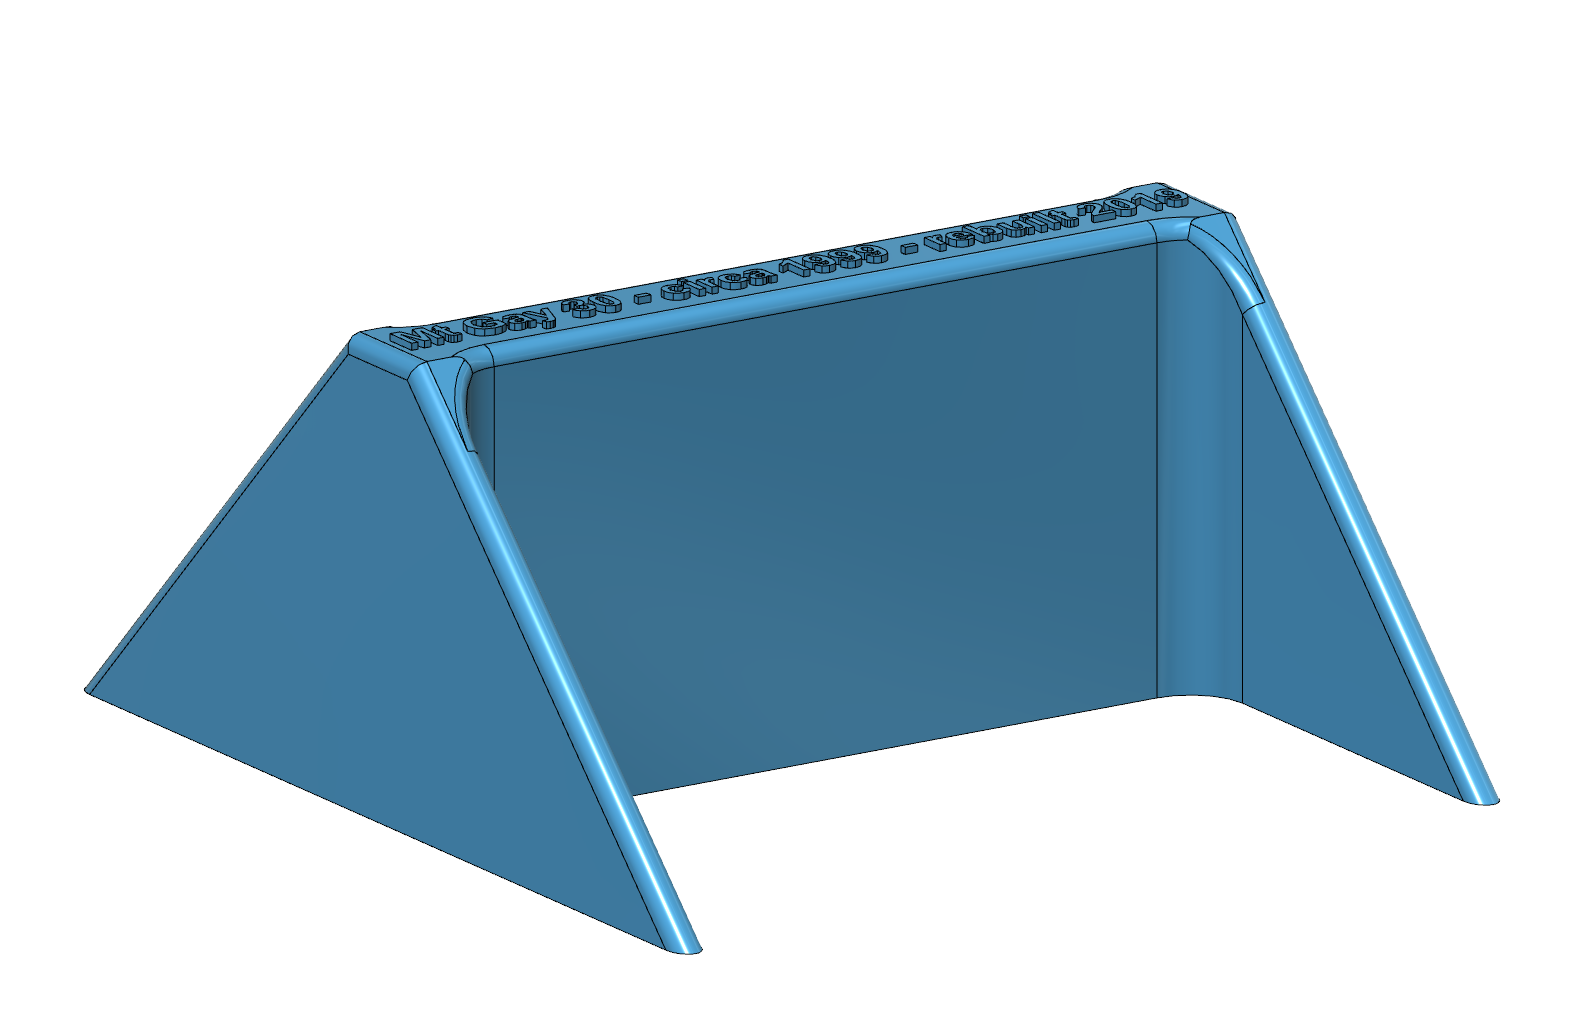
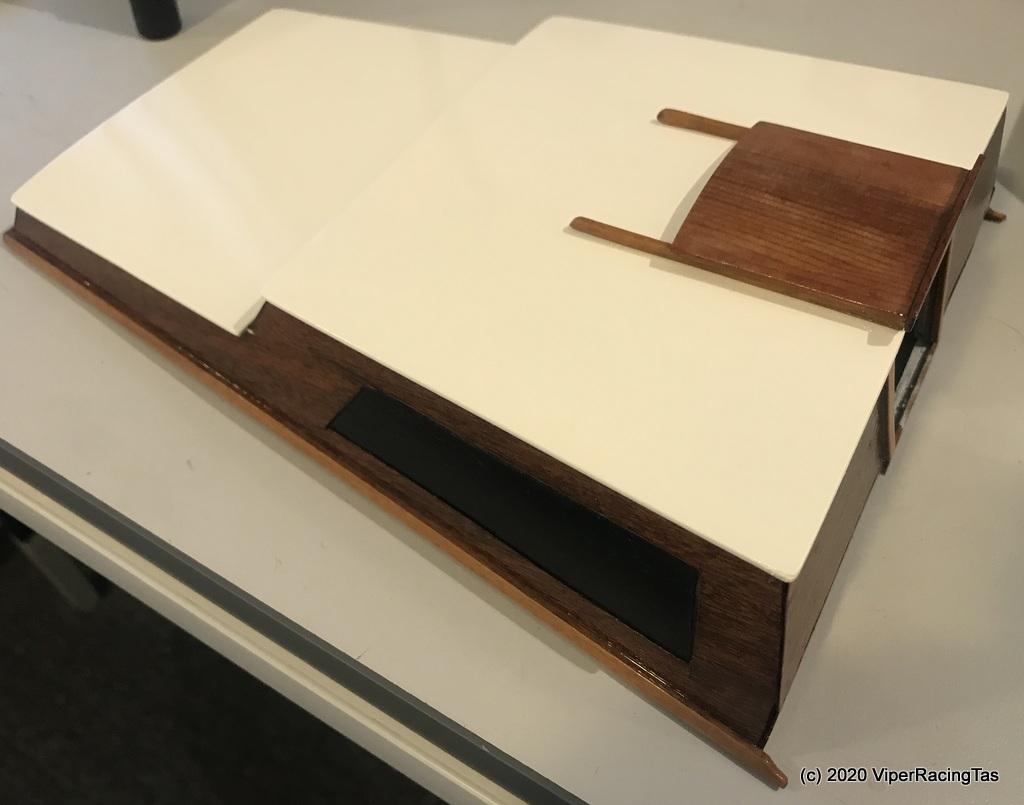
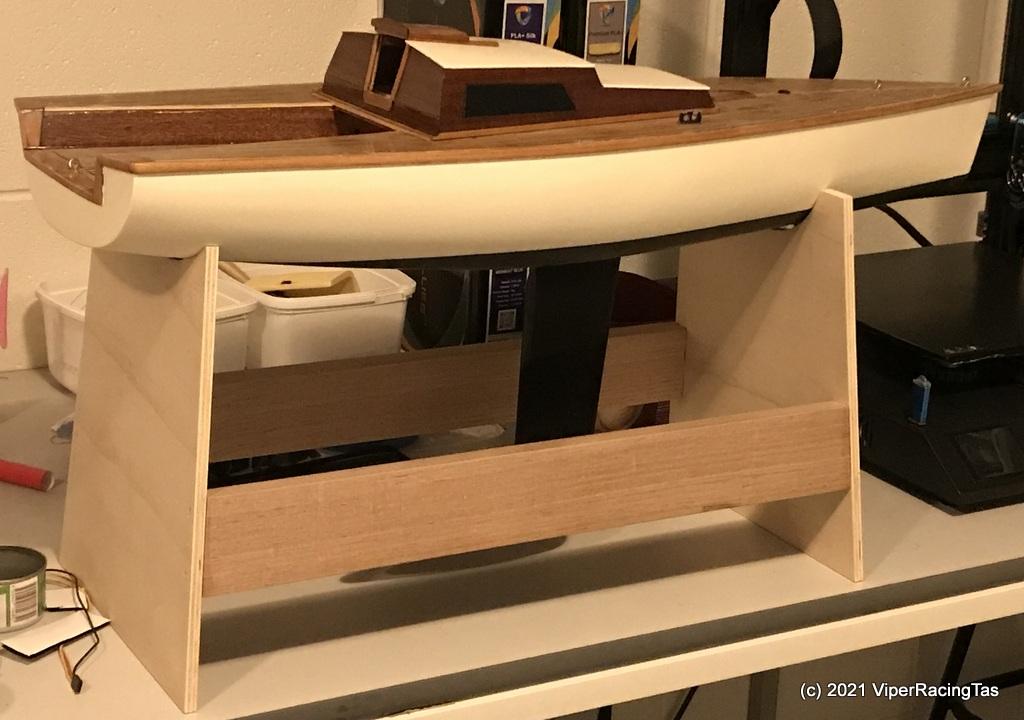
A bit more done today on the road to final completion, got the display/storage stand built today. Still needs a bit of finishing off and a coat of epoxy but at least the majority of it is done & it’s now usable.
-
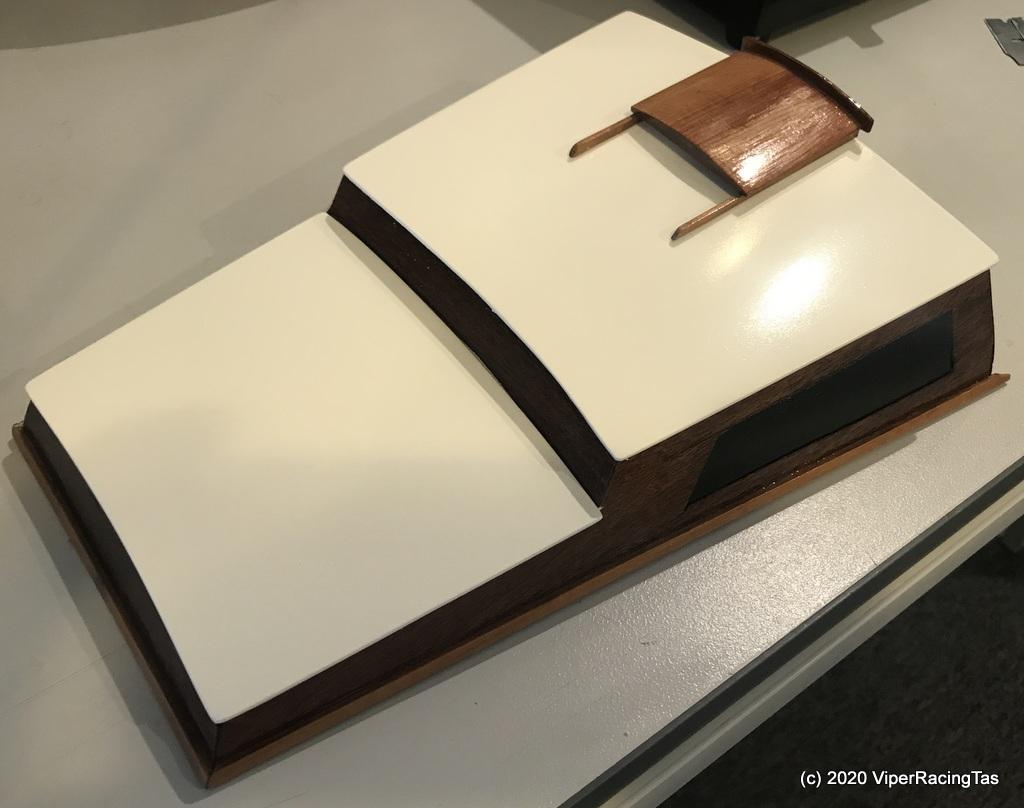
26 July 2021 at 16:17 #8813
It was another inside day again today so after walking the dog (before the bad weather returned) it was time to sand & finish off the display stand (just needs a couple of coats of epoxy now) & cut & polish the hull ready for reassembly
Quite pleased with the result after a very light cut & a coat of polish will add the final shine once all the rest is assembled.
Also got the sliding hatch cover re-glued to the recently repainted cabin. Real pleased with the way the Antique White came out, really suits it against the polished deck & black trim.
Definitely worth the extra cost to get the colour matched to the original finish on “Badger II”.
Also got the cabin door clear screen refitted & sealed into place ( opted for a diamond pattern glass rather than the plain clear glass – just because I had some)

The rudder has been sanded down ready for a very thin layer of fibreglass mat either side, which hopefully will stop the rudder from splitting all the time with the slightest bump.
Hopefully tomorrow the rudder will be done & then to start on cleaning up & painting all the deck hardware, rails etc. Might even get the waterline pinstriping & the stern labelling done as well.
-
26 July 2021 at 17:36 #8818
yes Mike What a great job Can’t wait to see it on the water
You know how I feel
-
27 July 2021 at 16:29 #8822
With another chilly day outside a fair bit got done to the Mt Gay 30 today.
The rudder has been fibreglassed, ready to sand & paint tomorrow.
Most of the stanchions have now been cleaned up and temporarily fitted today, this involved re drilling all the deck holes (well cleaning them with the Dremel with a router bit) as the new deck mounting timber inside the hull was now part way under each of the holes. Anyway, all fitted now with just 2 more holes required in the new deck timbers at the stern.
The safety rail holes all needed drilling out in the stanchions and most of the paint has now been cleaned off. Should be ready to re spray tomorrow morning.
Also most of the electronics have been reinstalled as well as the under deck sheet tubes.
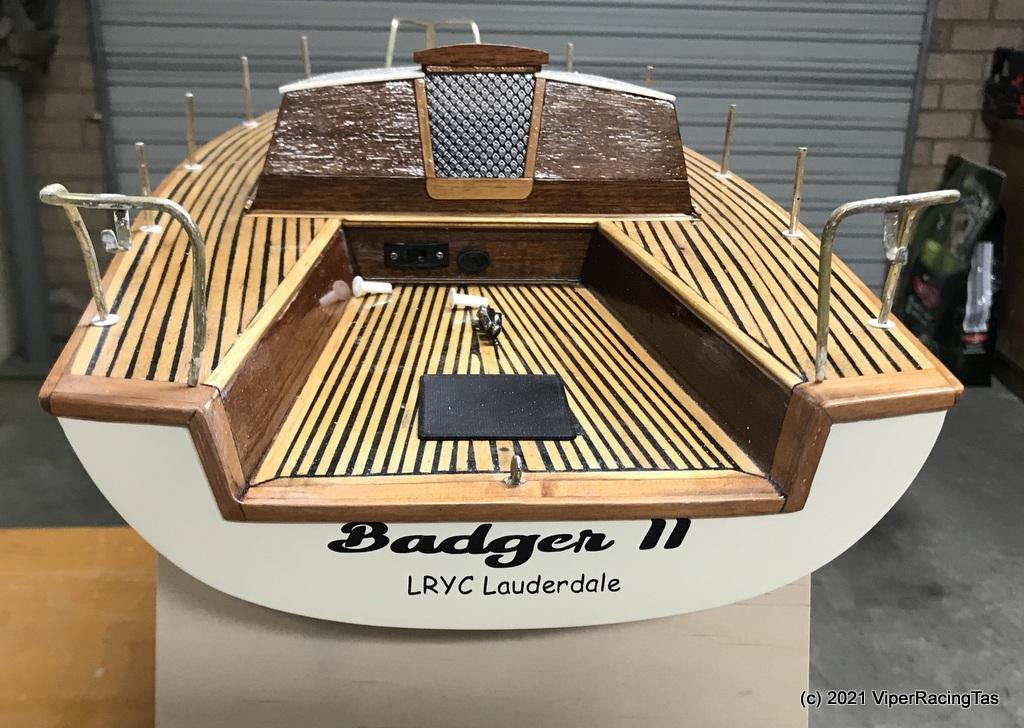
Even the Badger II name is back on the stern. Lettering is not quite the same as original but close enough.
-
27 July 2021 at 17:40 #8824
Gee Mike what can I sayIt really looks nice
-
28 July 2021 at 19:20 #8825
Today the stanchions all got cleaned up, re-drilled & painted with a couple of coats of primer & 4 topcoats of Antique White.
The rudder repairs also got finished and the rudder is now Gloss Black to match the keel & underwater area.
The final assembly can now start tomorrow.
-
29 July 2021 at 14:38 #8826
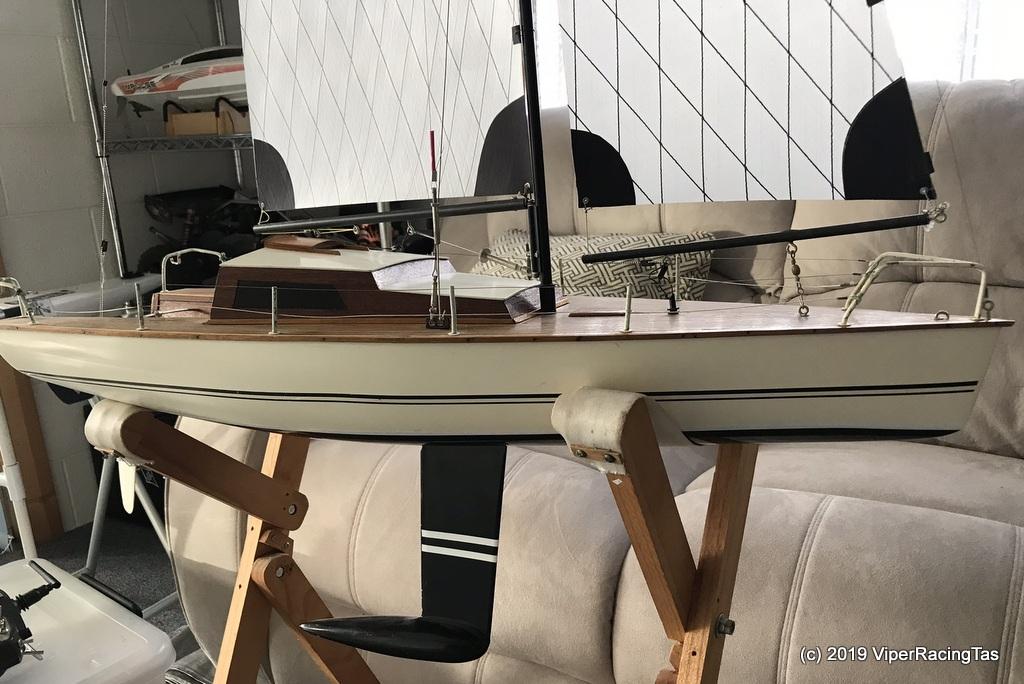
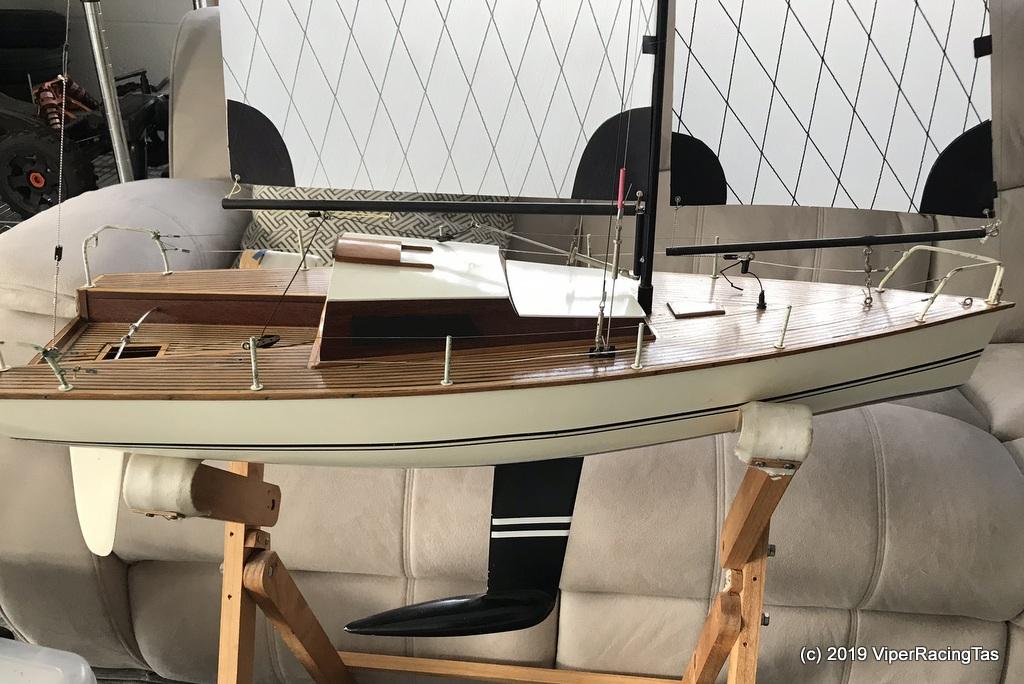
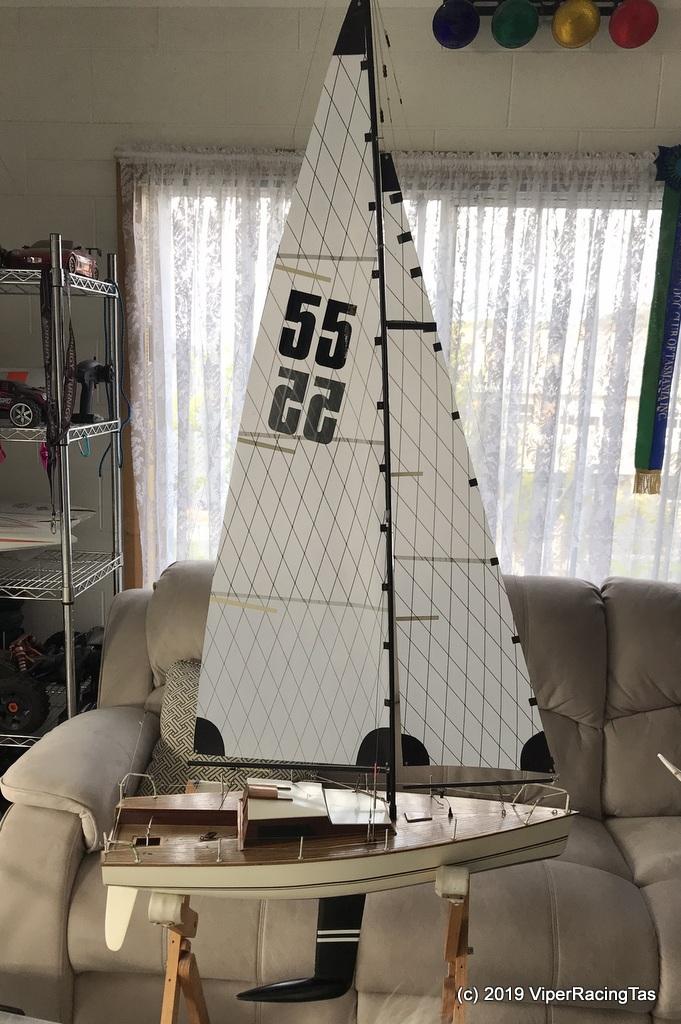
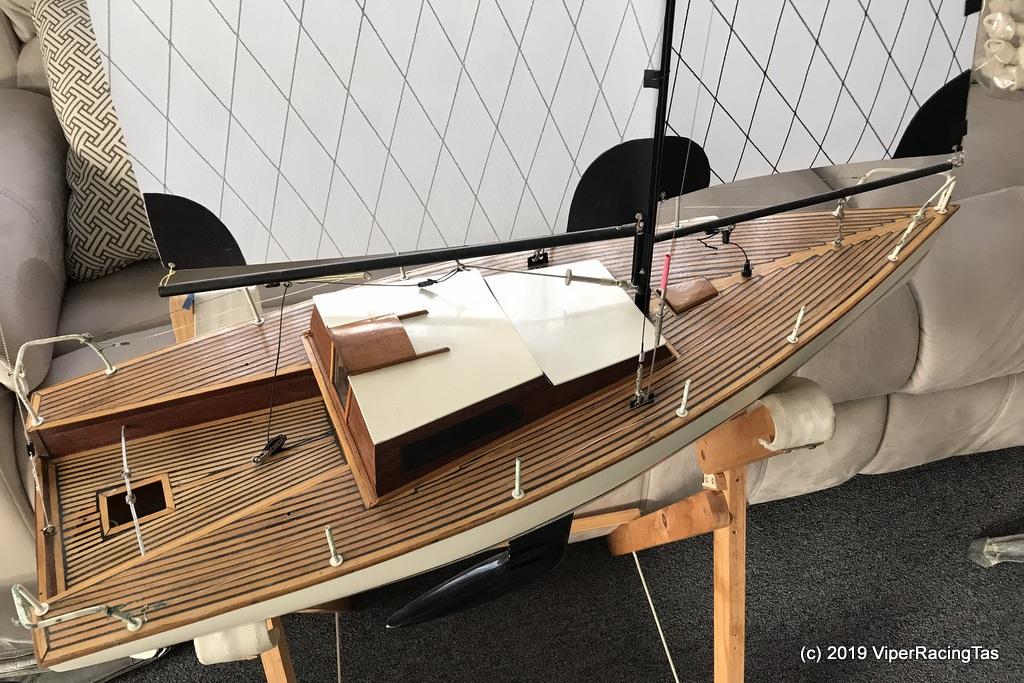
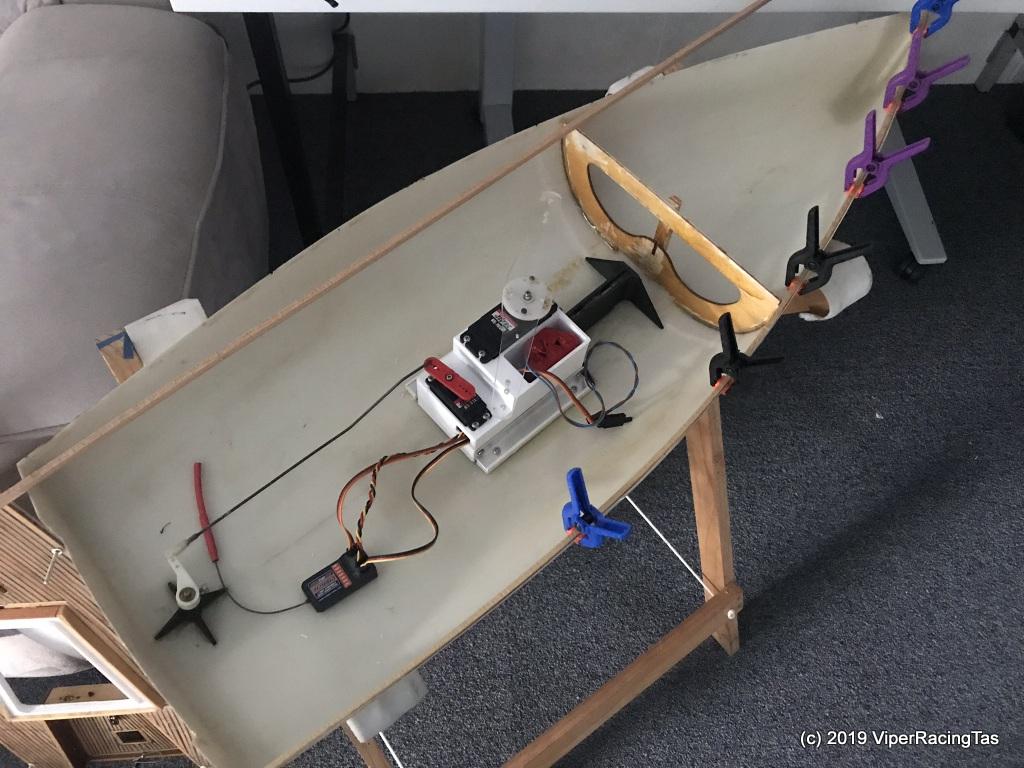
Well then, after way too long the refit of “Badger II” is complete (well almost).
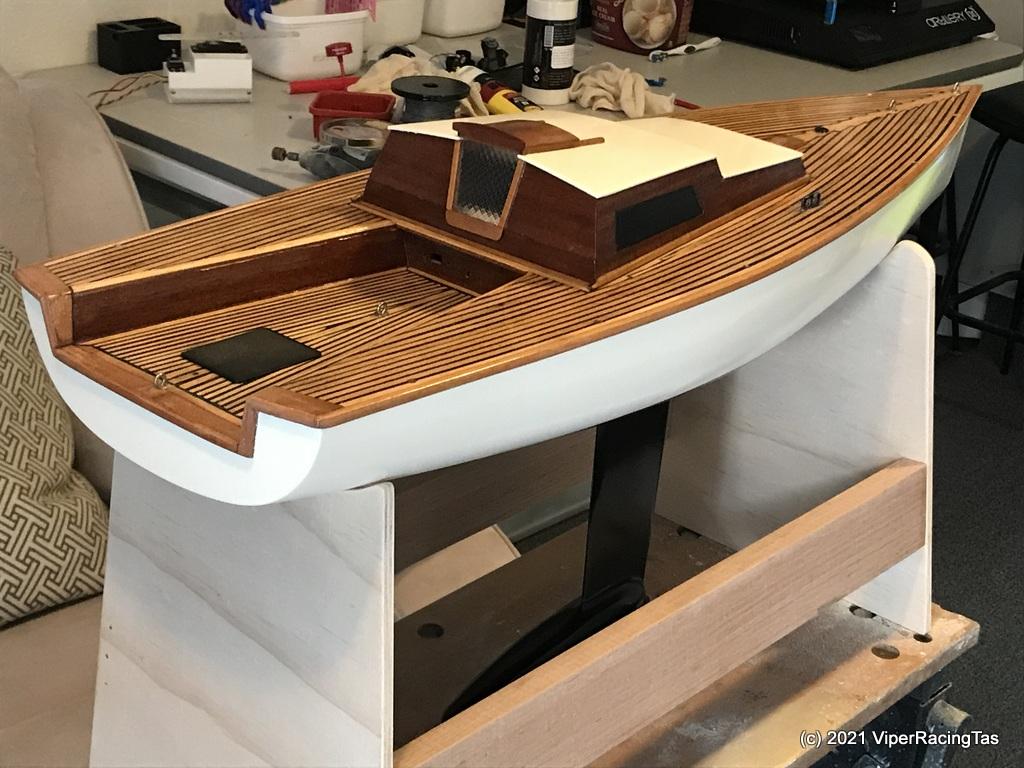
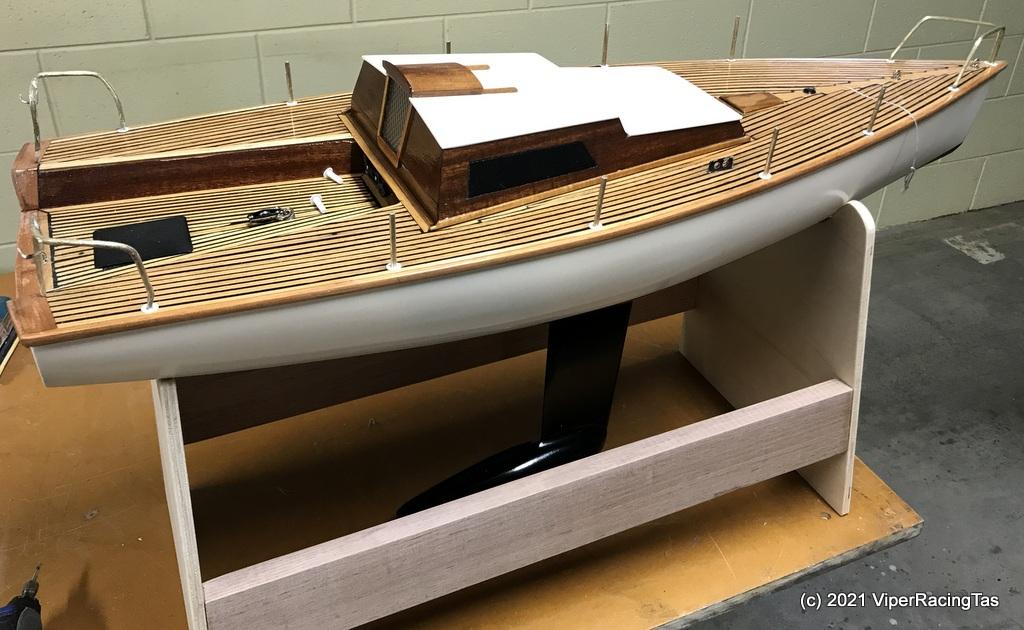
Safety rails were fitted today along with all new Stainless Steel safety lines. Rudder was fitted & aligned and finally the mast & all above deck refitted & set up for a test sail (maybe this Saturday).
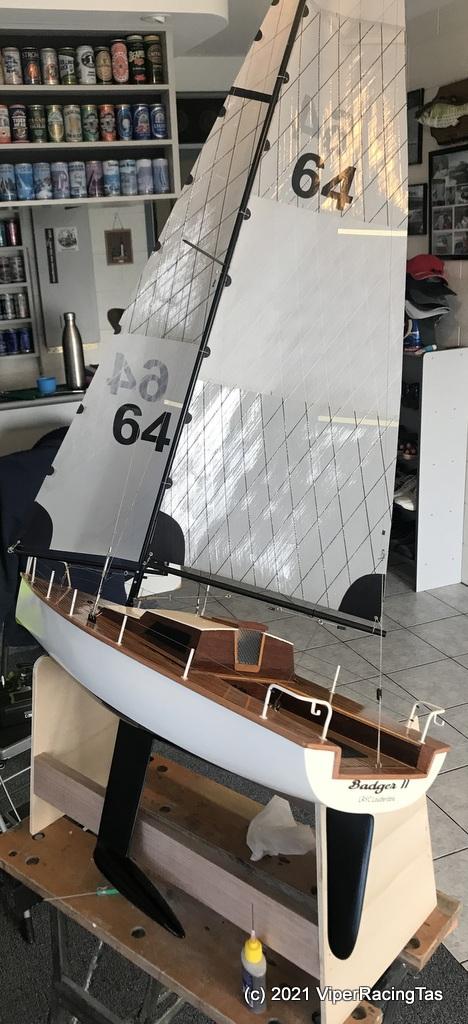
The Display Stand still needs a coat or three of epoxy and I’d like to apply another coat of Spar Varnish to the rub rail around the deck. Also the standing rigging all needs to be redone after a test sail or two.
I have purchased tiny stainless steel screw eyes to replace the way out of scale ones currently fitted to the mast & booms but this can wait till she sails a few times first.
Now just to make a new battery pack as I’ve currently pinched the one that gets shared between the 10R and the IOM.
Hopefully some video of her sailing this weekend will be the final post in this very long rebuild project.
-
29 July 2021 at 17:43 #8829
Great job Pred. Look forward to the video. If you want some 50+kph winds let me know and I will send some over. Oh I see there already on the way.
-
29 July 2021 at 17:47 #8830
Yes Tug, we’ve had plenty of wind down this way over the past week, that along with the rain is what has been keeping us all inside & away from flying.
You never know, “Double Trouble” could well hit the workbench tomorrow, if this weather keeps up.
Supposed to be 16 deg & sunny on Saturday with a breeze so a perfect day for a sail.
-
-
29 July 2021 at 20:07 #8831
Great Finish Mike hope to see it on Saturday
-
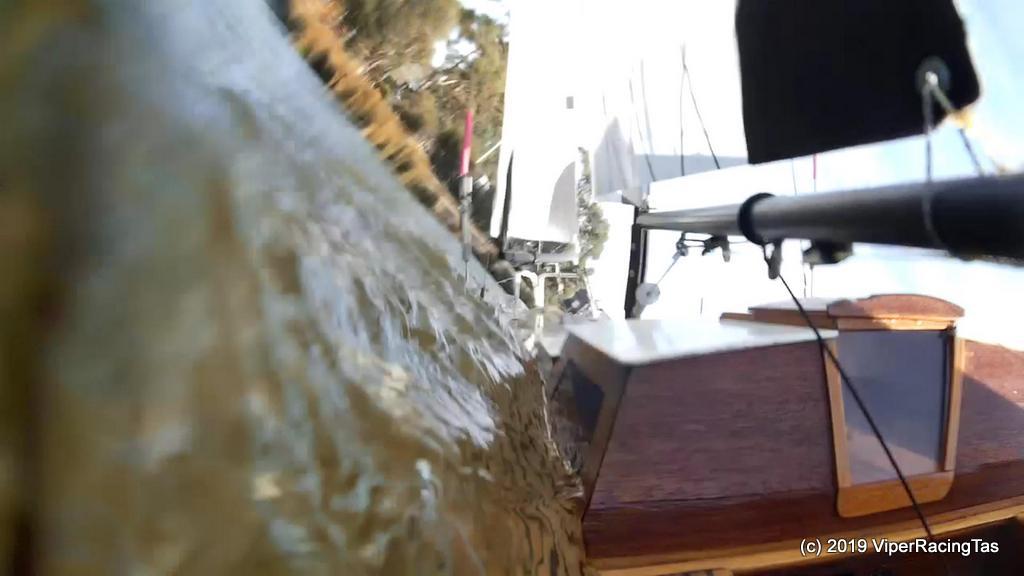
31 July 2021 at 16:44 #8842
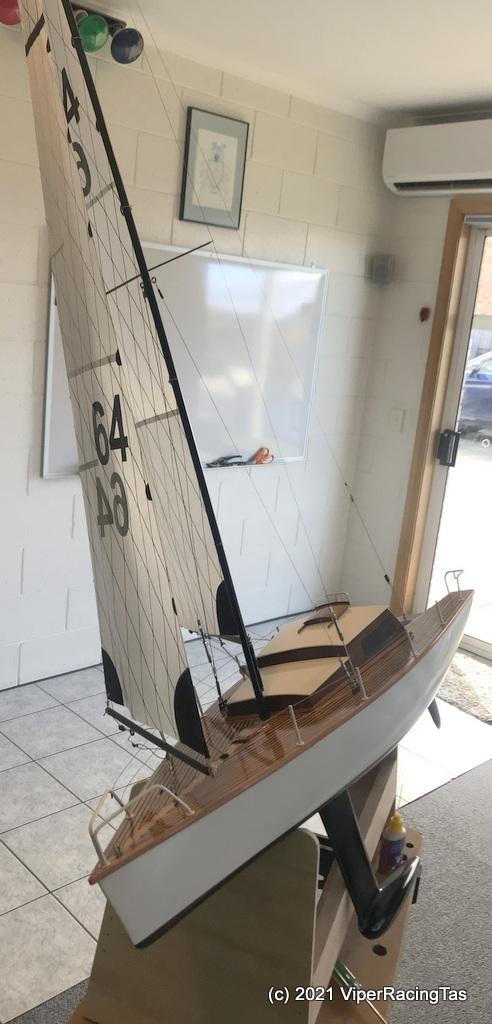
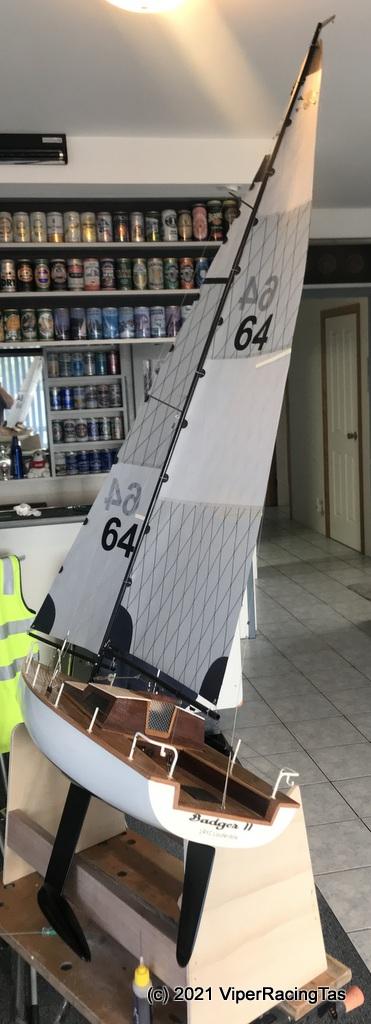
This will be the final entry in the rebuild log of the Badger II.
Still need to add a Topping Lift so the Jib sets correctly but other than that she sailed beautifully.
-
2 August 2021 at 18:44 #8867
Great video Pred, looks the part..
-
-
AuthorPosts
- You must be logged in to reply to this topic.