› RC VEHICLES › ELECTRIC VEHICLES › Rock Crawlers › Predators Crawler
Tagged: Axial, Rock Crawler, SCX10
- This topic has 0 replies, 1 voice, and was last updated November 26, 2018 at 3:02 pm by
 Predator.
-
AuthorPosts
-
-
26 November 2018 at 15:02 #1479
Bout time someone started using this site for what it was set up for, documenting RC builds. I will have a go at it with my Rock Crawler build
With a great deal of input from Murzwern (who has done it all before) I think I have ordered most of the parts required to at least get it up and running.
Started with a Custom Axial Honcho chassis that has been fitted with a Jeep hard body. Got it very cheap via auction from China, still waiting for it to arrive.

Ordered the various electronics & they arrived today (9 days from Power Hobbies – USA)
Motor – Axial 27T brushed AX24004
ESC – Axial AE-2 forward/reverse w/Drag Brake & BEC AX24259 (BEC not actually required as controller has one fitted)
Programmer– Castle Creations Field Link portable programmer c/w USB PC connection 010-0063-00
Rxr – FlySky 3ch 2.4ghz FS-GR3C
Txr – ex stock FlySky FS-GT3B
Battery – ex stock 5000mah 30-40C 2S Hard Case LiPo T5000.2S.30HC
One thing I forgot
Pinion Gear – Axial AX10 SCX10 Honcho Pinion Gear 20T w/ Set Screw (ordered from Discount Hobby in USA)
To date I have fitted the power plug to the ESC, dowlloaded the CastleLink software, programmed the ESC, connected the motor, ESC & Rxr & battery.
So far so good, the motor runs forward & reverse.
Now just got to wait till the rolling chassis turns up, should be here in the next 10 days according to the website.
Following right along
I have emailed the seller on several occasions but had no reply. 2 weeks ago I opened a dispute via PayPal & to date they have had no reply either. I escalated it to a claim for reimbursment last week so the seller has 10 days to reply or supposedly paypal refund the money & claim it from the sellers acct. Will probably find the acct has been closed & the money gone. Just be my luck.
Anyway 10 days is up next Saturday so not long to wait. Trouble is I will then have to find another crawler to buy as I already have the ESC, Motor, pinion gear, receiver etc all ready to go.
Just to add a warning to other readers, there appears to be a rip off scheme running on EBay at present.
You will find an advert, usually well worded, advertising a rock crawler or similar for auction. The first thing you notice is the advert is usually duplicated (sometimes with minor changes) 4 or 5 times but always by the same seller and all auctions finishing within a couple of minutes of each other.
The other thing that stands out is that it is a new EBay account (usually less than a week old) with no feedback. Oh, and the location is China but the advert appears only on the .au ebay site.
Since I got caught I have seen this at least 3 or 4 more times and always with a new seller account.
You have been warned.
Following right along
I finally bit the bullet & ordered an RTR Axial Honcho from Phils Hobby Shop in the US, his item price was slightly higher than elsewhere but as usual his postage was about half what everyone else is charging. To date his deliveries have always been quick as well. Was going to get the Jeep Wrangler Rubicon (only $20.00 dearer) as it appears to be an identical chassis & electrics but in the end the Honcho won out.
Axial SCX10 Rock Crawler Build Take 2
The new Axial Trail Honcho turned up from Phil’s Hobby Shop in the US a couple of weeks ago so after a bit of playing around it is now time to get serious and carry out a few upgrades, not that there is anything wrong with the RTR version, it’s just that you can always improve.

Initially the vehicle was run with one 5000mAh 3-40C 2S LiPo centre mounted at the front (standard for Honcho) but I found it a tad top heavy so the battery was relocated to the side step with another added to the other side for balance.

Whilst this mod resulted in a lower COG and better handling it was quickly pointed out by our resident Rock Crawler guru – Murzwern that a better option was to add lead weights inside the tyres. This has the effect of lowering the GOG without affecting the suspension (& ride height).
To this end I have relocated the single battery back to the stock location & ordered a set of alloy wheels with beadlocks (RTR tyres are glued to rims & almost impossible to remove without damage).
Upgrade items purchased so far include;
- 1mm Lexan underbody pan purchased from a supplier in QLD,AU.
- This has been cut in half & trimmed to shape, then sprayed black ready for installation. (not fitted correctly in pic below, cos the paint is still wet-bloody weather)

- Led Lighting kit to replace standard lighting (no control) to a new system including 2 channel Rxr control for
- Headlight Hi Beam
- Headlight Lo Beam
- Tail Lights
- Brake Lights
- Reversing Lights
- Indicators (front & rear)

- Axial Wraith interior complete with Corbeau Racing Seats. With just a bit of trimming & a minor redesign to the dash top it will fit fine.

- Even comes with “Good old Boys” rear parcel shelf Gun Rack complete with shotgun & rifle (the detail on them is incredible)

Tomorrow hopefully the diffs & gearbox will be dismantled & greased (marine grease) both for lubrication & waterproofing, the electrics waterproofed & the new lighting controller & extra leds installed.
The Lexan underpan can then be refitted but I need to procure a 6″ Action Man for the driver before the final mounting of the interior can be done.

cont…
Found a good 7″ action figure for my driver, he is on his way over from China.
Also ordered the alloy upgrades for the suspension & steering arms.
Ordered a couple of metal driveshafts as well but the supplier just informed me they are out of stock so they have done a refund.
Slowly getting there, must get the new alloy wheels ordered as well so I can fit the wheel weights.
Been a bit slow with this project but now that the house renovations are finished for Summer I will get back to this one & the 1/7 scale Offshore boat.
cont…
The new bullbar turned up a couple of days ago and the alloy wheels should only be a couple of weeks away so I better get building., At least the winch fits the new bullbar so that is a plus.


cont…
Been doing a bit of upgrade work on the SCX10 in recent days to set up for FPV control.
First thing was to get a good stable mount for the GoPro camera inside the cabin & looking out the windscreen.
Decided to add a double battery mount at the same time as this was experimented with ages ago but never followed up.
Fabricated a bracket from aluminum angle

With GoPro installed

Fitted to chassis with batteries installed

View of GoPro through screen

While I was in the modding mood, decided it was about time to fit all the alloy suspension upgrades that were purchased almost 12 months ago.
Front end was upgraded to 4 link trailing arm system (as per the rear).
Also replaced both plastic driveshafts with hardened steel units.

While working on the front end, the plastic steering arms were replaced with alloy (now allows for toe in/out adjustment)

Steering knuckles were also upgraded to alloy (all with bronze bushes)

Rear suspension was similarly upgraded

So that was pretty much the chassis upgrade.

Fitted the new Alloy Bull Bar along with the working winch, driving lights & fog lights

That was pretty much how she headed off to the first FPV driving adventure with Snit & Murzwern, this is how she returned,


This is the 5.8ghz Video transmitter antenna and the GPS receiver for the On Screen Display

A quick shot of the other vehicles in the trip. (Check out the videos – on this site)

Learnt a few things from the great trip so after giving the Honcho a good clean it was down to some more mods.
I’ve made a new bracket & installed a new HD minicam for the FPV gear and mounted it a bit higher in the cabin to get coverage closer to the front of the vehicle when driving.

I’ve also relocated the RC Rxr antenna UNDER the bonnet after breaking the mount tube several times during rollovers. Given that its a plastic (lexan) body it has no affect on the signal.

Overview of camera & antenna setup.

I have today ordered some alloy sidesteps from the USA and these will replace both my plastic sidesteps AND the battery brackets thereby lowering the batteries (and centre of gravity) by a good 10mm.

One other mod today was to lower the front body mounts by about 10mm to give the camera a better view without being obscured by the bonnet.
Looks better from the front as well.

Still need to sort out the new wheels & tyre weights (soon).
cont…
Finally got around to getting some bigger beadlock rims & tyres for the truck.
It is now fitted with 2.2″ Losi rims & Rock Claws, weighted to 320g on the front & 200g on the rear.
Alloy side steps have been fitted & these double as carriers for the 2 x 5000mah 2S batteries.

The $420.00 GoPro Hero3+ (Black Edition) has been removed & a $22.00 Banggood min icam fitted for the FPV. Decided the GoPro was a bit expensive to risk in roll overs (even if it was inside the body).
The Mini Cam has been fixed to the cab interior roof & aimed through a hole in the windscreen. I had tried to polish the lexan screen but it still distorted the picture fairly badly, this should be a much better picture.


The Bull Bar needed to be moved forward 3 mounting holes to clear the new tyres but to date I haven’t needed to cut the wheel arches. They may need a slight trim below the front indicators but time will tell.

Need to get a new enclosure & then the Video Transmitter, antenna & other associated electronics will be relocated to inside the cab as well. This will better protect them in a roll over as the circular antenna was taking a bit of a beating mounted on the rear tray, even with the roll cage to protect most of it.
cont…
Video transmitter & antenna have now been relocated inside the cab.
New camera setup works great.
Now time to fit the interior,
First the seats were installed, mounted on aluminium angle attached to the new Side Steps/battery holders, then a cardboard mockup of the console & floor area was created, this was topped off with the detail salvaged from the Wraith interior that I had originally tried (unsuccessfully) to fit.

Using the cardboard as templates the centre console & floor was created from Styrene sheet

Joints were reinforced with 1/8 styrene angle
The underside
 From the Top
Installed for test fit

Next was to do the under guard area (once again start off with a cardboard mock up to use as a pattern)


Then proceed to cut out from styrene sheet


After heating & bending into shape ready for sanding & finishing

A test fitting of the RHS before starting the process again for the LHS

Both sides fitted & glued to floor pan, Axial Wraith interior converted to RH drive (for Australia) and cut down to fit over new styrene console.
The screws through the gear levers hold the detail interior to the new console

How it looks from underneath (before painting)


A quick spray, metallic silver inside to match “The Truck” & satin black underneath the guards

Under guard shot after painting

Interior shot, not great through the Lexan windows but you get the idea.

“Arnie” ready for another hard day at the office!!
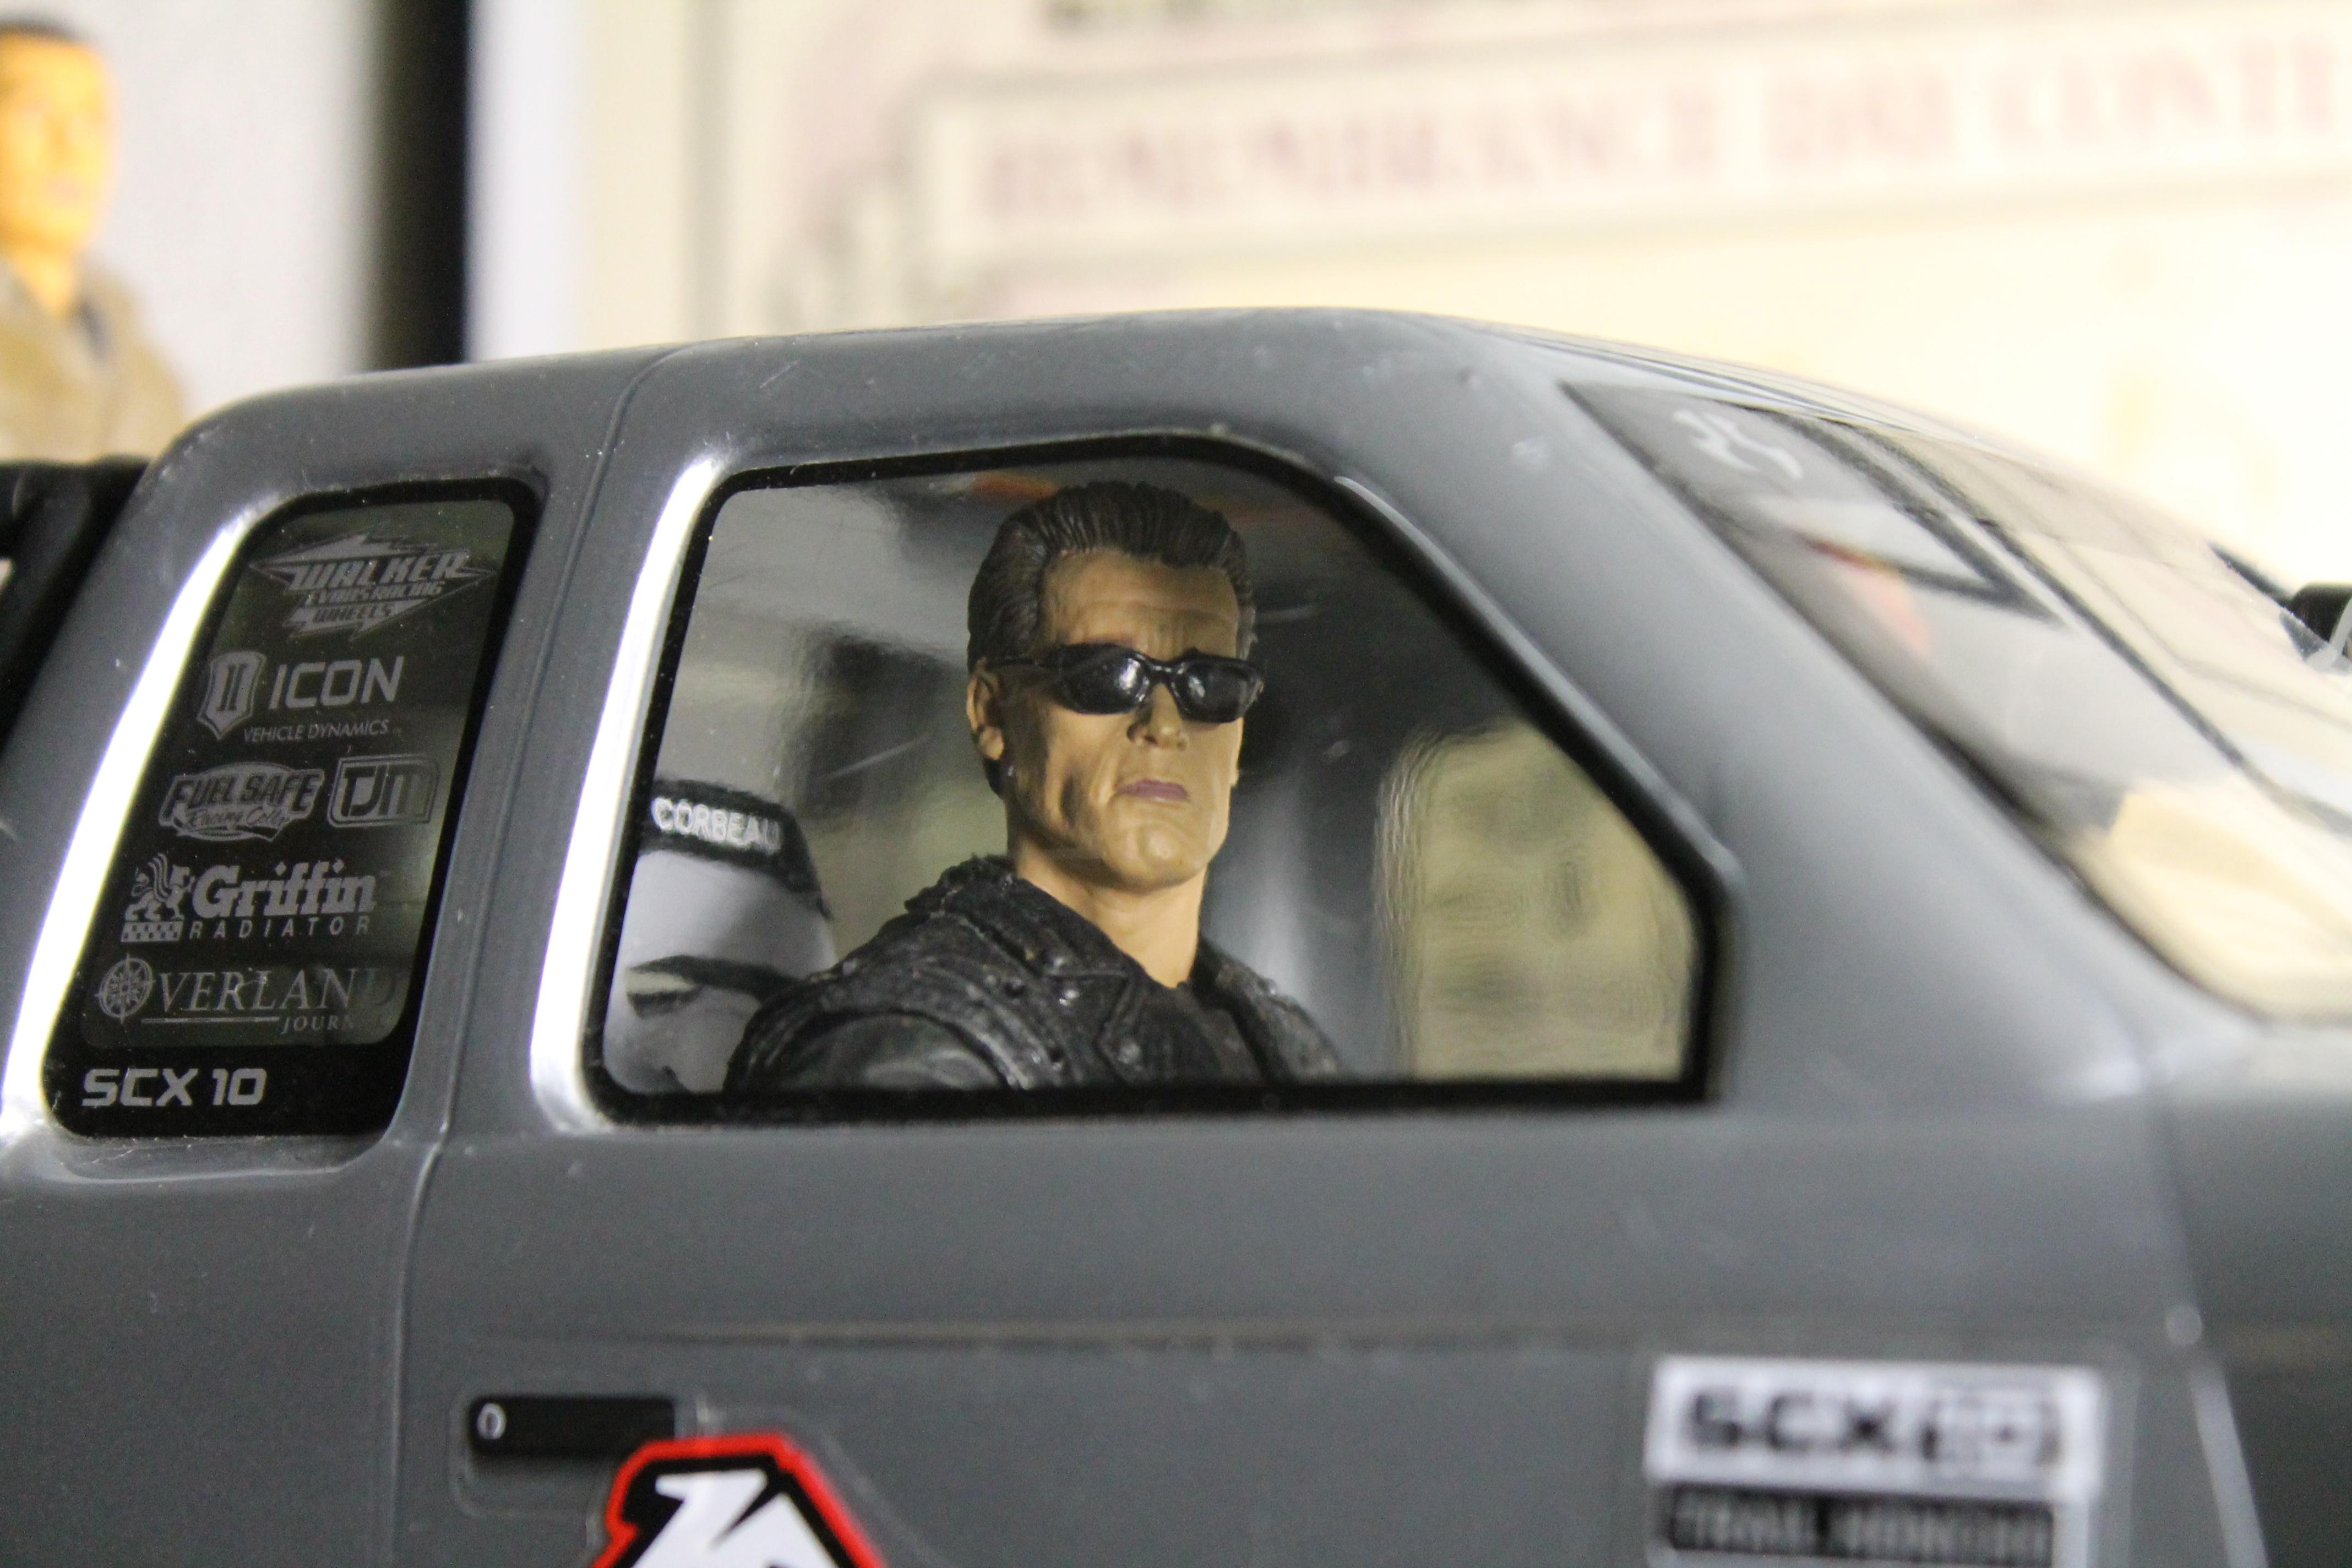
One final Shot of the finished article ready for “Arnie’ & “Marcus” to head off for some serious bush bashing.

Note that the winch hook has been changed from a “jewellery’ style clasp to a scale winch hook complete with shackle & split pin & the winch cable is now crimped correctly rather than tied in a knot. Looks much better even if the cost was rather over the top.
One other thing worth noting is the whole interior & under guard area is fixed in place with only one screw (front mount for original battery mount) so makes for easy removal for maintenance. It fits in rock solid and leaves just enough room behind the seats for the box holding the 5.8ghz FPV video transmitter & antenna and for the battery connections.
The End

-
-
AuthorPosts
- You must be logged in to reply to this topic.