Forum Replies Created
-
AuthorPosts
-
It was another fine day for flying @ the Field today.
Only a small crew of Moose, Chris, Gerald & myself.
Chris posted an early start as it was to get windy around midday, and it did.
No major issues today & from memory apart from one wing-tip that needed re gluing on my Sky Shadow, everyone’s planes went home in the condition they came.
G’day Dave, the Bix 3 is a good trainer but I would suggest removing the wheels until you get used to it. A rough landing will almost always cause the wheel strut to break the nose off the plane.
If you need a stabiliser setup for it I have a couple of FY-41AP Lite systems available for sale. This is identical to what my Bix 2 had installed when you were learning to fly.
Well done Mr Frog. Another quality video from Toad Hall Productions.
It was another fine day for flying but as alluded to by Chris it was not without incident.
I was testing the new release of iNav 4 in both the Sky Shadow wing & the Raptor FPV plane as as there is a bit of a learning curve with new firmware releases I was anticipating problems.
The Sky Shadow was first up and after the first failed self hand launch I was assisted by Stephen, this launch went much better but the wing would not fly level with the AP on. Upon landing I found the FC had dislodged on the first failed attempt so after re securing it the wing flew beautifully. V4 appears to work very well.
Next up was to try the repaired Bix 2 sport (fitted with a ZOHD AP). The Bix flew well (as expected) however unfortunately, when I momentarily lost sight of the plane, the ZOHD RTH DID NOT WORK and the plane disappeared, never to be found again. First plane I’ve ever lost since I started flying & I don’t know if the electronics failed or the battery disconnected after crashing but I completely lost the RSSI signal (which we always use to find lost planes). A fairly extensive search was mounted where it was last seen but as no one saw it actually go down it was a bit like the search for MH 370, going no where fast.
I opted not to fly the Raptor FPV as the rudder was programmed in the FC incorrectly & I didn’t want to tempt fate again.
For the rest of the day I just stuck with flying the Sky Shadow wing & fiddling with the iNav V4 firmware.
As for the rest, Dave & Andrew had a mid flight coming together which pretty much totalled Dave’s Razor & also left Andrew’s big 3m glider in need of elevator & fuselage repairs yet again.
Kermit had a prang with his Cub (repairable) & I think everyone else got away clean from the day.
Only one video from me today
Very nice Uncle G, some very nice models here, just a pity they didn’t stay around for a bit longer. I was running late today & arrived @ 10:20am and your mob were already all out of the water. We may have started a bit later down @ the pontoon but we did at least hang around till the sun was over the yard arm !!
Not to shabby Mr Kermit but Why oh Why are you back using 720p again for publishing instead of 1080P. The quality difference is like Chalk & Cheese.
Gunwale strip sets it off nicely. I’ll need to put some on Double Trouble soon.
Be interesting to see how the new radio protocol works, certainly nice & small.
I remember in the early days (for me) when 10k range from a Taranis was considered a ridiculous range, now you are talking 40k. Will it never end ?
Hey maaate, I’m only an Old Age Pensioner, I can’t afford to bribe anyone, except perhaps my dear Wife when I want a new plane !!
If you run out of time, as often happens with video editing, you just have to wait & finish it the next day, BUT you do need to post on the site that you have been delayed as the Fur Coat has been known to jump the gun on the odd occasion or three and issue the award on what is available.
Kermie my main frog, I thought your video had some great content (especially the Oops bits), but personally I don’t think your editing this week was up to your usual standard.
Was only saying to the guys @ the field last week how nice & tight your editing had become with no wobbly shots or blue skies with no planes, quick switches between scenes etc but this week I didn’t think it was quite there. Maybe you thought this week you were a shoe-in (especially as I left my camera at home), but that just meant I had more time to concentrate on the aerial video footage.
Always next time eh!
Well thank you yet again Mr Moose.
Much appreciated.
Yes, certainly was another fine morning for flying @ the Field today.
Here is my video from the FMS MDM-1 Fox 3 metre glider. The flight was over 30 minutes (mostly gliding) but I’ve edited it down to less than half that.
I forgot to take the Sony 4K HandiCam today so the only footage I have “around the field” is from my mobile phone.
So I guess you will be joining us @ the Field on Sunday then eh?
Yes Chris, no doubt my run of good luck with the 2022 GMA’s (3 in a row-WOW) will come to a sudden end once Kermit & Gerald return with their cameras to the Field.
Glad you got your Drifter back in airborne condition in such short time.
I have almost completed repairs to the Bix 2 Sport after its minor altercation. The nose has been glued back on (nice clean break) so all I need to do now is re heatshrink the ESC and reinstall it then make a new glass for the cockpit and she should be good to fly again.
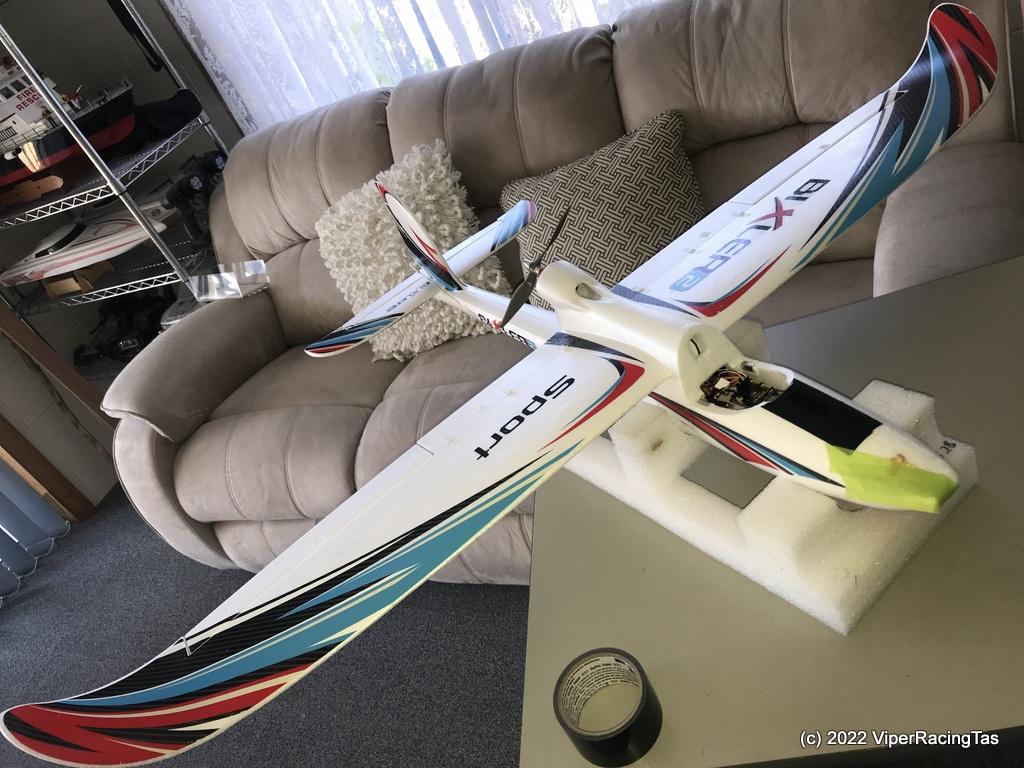
There was a small hole in the nose that’s now been filled with gorilla glue (just waiting for it to foam & set before trimming) hence the green tape.
Thank you Mr Kermit.
Did you finish the shack ?
Thank You Mr Moose.
-
AuthorPosts